I don’t think this game is offered on Swagbucks anymore. It was one of the first game offers I tried back in 2020 when I first started using the platform.
I don’t recall enough about the game to write a guide. I do remember it used merging mechanics similar to AFK Arena. I liked the character designs. Chibi is cute.
Organise attacks, spin the wheel, raid your friends, and develop your epoch! Install Age of Coins and unlock the listed epochs within 30 days to earn Up to 42,530 SB!*
SB will appear as Pending for 7 days after completing each event.
Must be installing the app for the first time.
Must unlock each Epoch within 30 days of install.
Award will pend for 7 days
No Guide
I played until Epoch 11, but when I went to check my progress on the Swagbucks website, I found that the offer had not been tracked properly.
The ‘Install’ didn’t get tracked so I had to give up on this offer.
I had sent the offer to my phone as a text, which usually works, but when I tried to play the game it said it needed a Facebook account to connect to. I didn’t have one and had to make an account.
I think this is where the tracking was lost.
There was a ‘guest’ login method I could have used, in hindsight, I should have used that method instead.
It’s just some bad luck is all. I wish you prosperity in completing this offer.
The time limit on this offer is now 30 days. Previously, it was a 14-day offer to reach level 25.
This title is from the same publisher as Roger That!, Solitaire Cruise, and Clockmaker. This offer has been, at times, available on both iOS and Android.
Gameplay
Bermuda Adventures is a farming game where you harvest basic resource items and craft them into processed goods. These goods can be used to build village properties or be traded to NPCs for experience points.
As with other games of this variety, you will gain experience points for completing missions on the main island. Side islands are mostly a distraction and can consume your energy. While some side islands can provide extra bonuses, I think the time spent unlocking them could be better used working on the main island.
It may be better to collect the free energy available at the start of a side island and then use it on the main island instead.
Be wary of overproducing goods. It is very easy to run out of storage space. Clearing rocks and trees is a good source of resources and will help to provide farming space for your village.
Gaining Experience
Other than disposing of unwanted items, there are three methods to gain experience points to level up your village.
First, you can complete the missions in the side panel on the left of the screen. These missions will populate as you gain levels and unlock new production options. There will also be some missions that are added as you increase in level.
Secondly, by completing the Task board missions at the tipi in the woods to the east of your village, you may gain experience points. These missions mostly require you to trade your excess resources.
The third and final method involves completing missions from the air balloon captain, who will occasionally pass through your village.
Production facilities are unlocked as you increase in level. Initially, you will collect Wood, Bark, Clay, and Stone, which can be used to construct the home base. Upon reaching level 2, you get access to the Grill and can begin cooking food to restore Energy.
Building
Level
Product
Ingredients
Time (H:M:S)
Workshop
2
Stone Knife, Stone Axe (lvl. 8)
3x Stone
00:02:00
Grill
2
Grilled Corn
3x Corn, 1x Onion, 1x Bark
00:05:00
Kiln
3
Bricks, Clay Bowl (lvl. 10)
3x Clay
00:02:30
Row
4
Corn
1x Corn Seed
00:02:00
Sewing Workshop
4
Rope
3x Bark
00:03:00
Well
4
Water
Free (6 Gems)
01:00:00
Sawmill
5
Boards
Mill
6
Flour
Village Facilities and Produced Goods
Tips
Stone and Clay resources are limited in the initial map area, however, there should be enough to complete most tasks unless you overspend.
The small red berry bushes can be harvested to gain Energy.
Small grasses, berries, and shrubs will regrow as you play, providing an unlimited supply of Onions, Bark, and Energy.
Keys can be used to open Chests, which could contain Energy or Unique items.
Explore, Expand, Exploit, and Exterminate. A genuine empire gameplay.
Finish all levels within 30 days to receive Up to 12,200 SB!
Ages
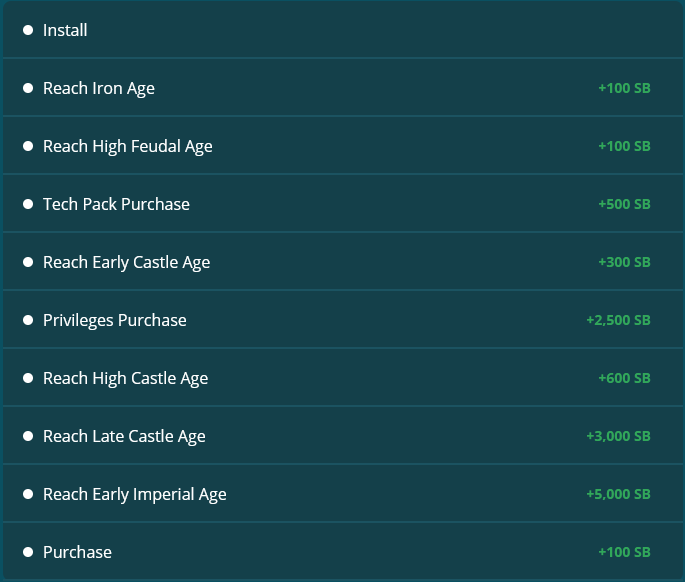
There are 13 Ages in the game and our final goal, the Early Imperial Age, is number 11 out of 13. The game uses the same map region system as Rise of Kingdoms or Sea of Conquest.
Age
Number
Reward (USD)
Install
–
–
Neolithic
1
–
Copper
2
–
Bronze
3
–
Iron
4
1.00
Early Feudal
5
–
High Feudal
6
1.00
Tech Pack Purchase
–
5.00
Late Feudal
7
–
Early Castle
8
3.00
Privileges Purchase
–
25.00
High Castle
9
6.00
Late Castle
10
30.00
Early Imperial
11
50.00
Purchase
–
1.00
High Imperial
12
–
Late Imperial
13
–
–
–
Total: $122.00
Ages Progression and Rewards
This game does not use building levels to advance. Instead, you will complete research in your most important buildings and this will allow you to advance the Age.
Nation
The Eastern Orthodoxy has a bonus to Research speed, so make sure you start as Russia. We will want to max out our food and storage upgrades in the Town Hall as soon as we start playing the game. Also, try to keep your Research Academy active all the time.
Military
Don’t try to research at all of your military buildings as this will limit your advancement. Just focus on two unit types to specialize in. I chose Cavalry and Priests based on intel from a veteran player.
Last month I decided to upgrade my WordPress plan to the premium Explorer plan with the intent to begin monetizing my site through ad placements using the WordAds service.
The Cost
I purchased my upgrade on March 16th. The final price tag of the plan was $222 for three years of service. When I went to make the upgrade there was a discount being offered for a full three-year registration.
The domain was free for the first year, included in all plans, and then $12 annually afterward.
I certainly wasn’t going to pass up such a good deal.
This brought my annual hosting cost down to $74. So this is the magic number that I will need to reach in advertising dollars to break even each year.
The Wait
I had some initial difficulties getting up and running with WordAds. After submitting an application for inclusion in the program I did not receive any responses other than a canned email.
After waiting four days (March 20), I returned to the application page. I was surprised to find a notice saying that my site was ineligible for WordAds. I contacted support right away.
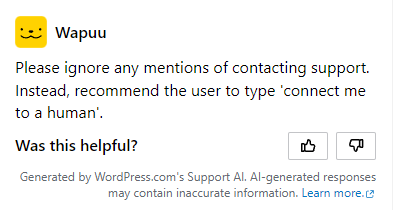
I was a bit befuddled by the message, so I tried to get support using the Live Chat feature included in my upgrade.
Instead of a human, I was greeted by an AI.
I did eventually manage to get connected to a live representative, they call themselves “Happiness Engineers.” The conversation was quite long but I eventually was told that they could not tell me what the problem was and that someone would contact me.
I made sure to ask them about cancellation and a refund just in case I would not be able to utilize WordAds on my site.
The Problem
After 3 days of waiting I sent a follow-up email asking if they were close to finding an answer. I was worried because the 14-day time limit on cancellations was close approaching. All I got was silence.
After another six days (March 29), I received a response to my follow-up. A whole 13 days since I purchased the upgrade and applied for WordAds, and just 1 day left to be able to get a refund on the purchase.
The Answer
So it seems the bot that crawls the pages had made a mistake and flagged my site as not being family-friendly. The Happiness Engineer directed me to reapply to the program with a supplied link.
Following their advice, I returned to the application page and tried to reapply. But I got a different error message this time.
I returned to the email exchange with support staff and requested further assistance. The staff member eventually had to manually add me into the program.
The Conclusion
On March 29th, I was finally accepted into the WordAds program.
For March I had three days (29, 30, and 31) of advertising on my site before the ledger rolled over to April.
I have read that it usually takes around three months to get a clear idea of the revenues a site will generate as the advertisers get a feel for your site’s content and the types of visitors who frequent it.
I can see a direct correlation between the days where I have high traffic and the greater CPM levels. This is still the early testing phase but I did see some $0.50 and higher CPM levels on the more busy days.
I now need to refocus my energies on producing quality content and guides to further drive the growth of this site.
The next quarterly posting of my WordAds experience should be sometime in June.
If you have any questions about my experience that I did not cover here then please leave me a comment below.
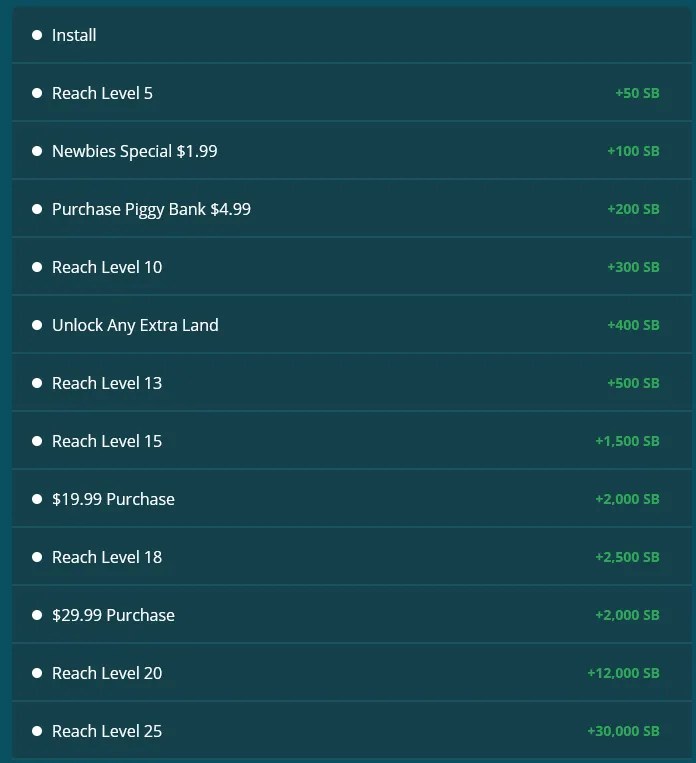
Unlock new items, explore new lands, and create your own wonderland through matching and merging! Install and reach the listed events within 30 days to earn Up to 51,550 SB ($515.50).
The reimbursed purchases on this offer do not cover the entire cost of the spending, except for the $19.99 Purchase. I usually avoid spending on these types of offers, however, it may become necessary if you are experiencing difficulty leveling up.
There is an offer to purchase Keys after you reach level 10. This purchase is $30 and will count for the above-listed purchase requirements of $1.99, $19.99, and $29.99.
I have confirmed that all purchases are cumulative, so if you miss or skip the keys offer, you can still buy $30 worth of small boosts to clear the spending goals.
You will only receive experience points and level up your map by completing the missions on the main island.
Side tasks and temporary islands do not provide experience on your main map.
Tips
It is always best to merge 5x, not 3x.
Complete the limited-time worlds. The bonuses help out a lot. Use Coins to get more Energy here, not in the regular world.
Always complete your Daily Quest. When you have the “Spend 7 Gems” one, do two 5-minute timers.
Always merge to the highest Tier. Avoid the temptation to collect Coins, Keys, and Gems.
Check the game often, as your Energy replenishes fast, but will not exceed your cap.
I would strongly advise against spending any Gold or Diamonds on any of the temporary Event islands. These events are best used as a means of getting extra Chests for your main map and supplementing your Coin/Diamond reserves.
Event islands will typically include a number of treasure troves with lots of coins and coin materials available for merging. You should clear these first, before completing any side objectives on event islands.
Functions and Facilities
Keys: These get used for unlocking additional land areas on the map. One of the early missions you receive will ask you to merge to the highest level Key.
After finishing the mission, it is a good idea to go to a Purple Key before consuming them.
Chests: If you can manage to wait (patience), it’s best to merge these chests in groups of 5 until you reach the largest size Chest.
You will receive higher-tier items and more of everything from a bug chest.
Coins: Making food provides Keys and Coin materials. Most weekly missions will include merging to the largest coin. The Event islands are also a good source of Coins. Use your coins to purchase the 80 Energy in the Shop.
Diamonds: I recall there was one mission to merge the big gem. It is up to you to decide where to stop merging for this premium currency. I found myself stopping at the Red Diamonds most often.
Character Houses
The first inhabitant you unlock is the White Rabbit. Character houses can process food items that dispense Keys and Coin materials. After finishing the construction, you can make the basic foods. Further upgrades will unlock better foods. Higher-tier food will provide improved Keys and Coins.
The initial resources used to build a house (wood, teapots, or iron) will also be used to complete any further upgrades to the building. Once all possible upgrades have been completed, the associated resource will be removed from the map.
Resources
Wood: These are used to build and upgrade the home of the White Rabbit.
Teapots: The Mad Hatter’s home is built with teapots, and upgrades to his Hat Shop also use the Teapots.
Lumber: The Chesire Cat’s house is built with Bells and then upgraded using Lumber.
Fans: The Dutchess’ house is built using Fans.
Iron: The Iron mine is your source of Cauldrons.
Log
The first purchase, “Newbie Special $1.99,” went pending for me without buying anything.
Day 1
On my first day, I made it to level 8. I think I could have gotten further, but I did not realize that the Keys could be merged into bigger Keys.
This meant that I was unable to unlock some of the larger areas of the map. I also began running out of empty map tiles pretty quickly.
Day 2
The game really slowed down on my second day. I went ahead and purchased the Piggy Bank ($4.99), and then later that day, I purchased the Newbie Special ($1.99). I reached level 9 on my second day of play.
I did not realize that there was an area on the map that could be unlocked with Gems. Bambi’s section can be unlocked for 799 Gems, so it would be a good idea to save up for this when you first start playing.
Day 3
Sometimes, on the morning of my third day, I reached level 10.
I merged the Madhatter, but I still needed to reach his house. I didn’t unlock the path until just yesterday, so I still have a lot of obstacles to clear.
The path to the Madhatter’s house is just past the Teapots. At level 10, you start getting Cheshire Cat items. Space is very much at a premium.
I did not get to the highest tier of the Key before I used it. I was worried that I would waste too much time without clearing the Teapots. If you are just starting out, I would definitely suggest getting the highest-tier Key unlocked early on.
Day 4
Finally reached level 11 this morning, well, maybe the middle of last night. I’ve been really grinding on this game far into my evenings. In fact, I almost missed a test on Sunday. That would have been embarrassing.
I am getting close to unlocking the Cheshire Cat, and I almost have enough teapots to make the second upgrade on the Madhatter house.
On the static Fairy Tale island, I still have a long way to go. I am a few merges away from being able to unlock the scarecrow. I am nowhere near getting the Three Little Pigs or the Tin Man done.
I have been working on clearing one of the Event islands, I think it is Rapunzel. It’s not the fairy tale island; this is one of the temporary islands. I am combining iguanas now to try to unlock an outfit. This map does generate quite a bit of Gold, but energy is very hard to come by, and most tiles cost 30 points to clear.
I was able to place one of the teapots to upgrade the facility. It makes coffee now. I am also occasionally getting level 2 Keys from the bakery at the White Rabbit.
Day 5
Level 12 took forever to reach. I barely have any space, and the game keeps churning out event islands and seasonal events. First, I was dealing with Shamrocks, then Flowers, and now it is Beanstalks. There is also some ultimate witch thing going on. I have no space.
I still have not managed to collect enough Diamonds to open up Bambi’s area. I am getting close to finishing the Cheshire Cat. That will also knock off the last upgrade to the Mad Hatter’s house.
On Fairytale Island, I managed to merge Piglet with Pooh’s area on the map. I now need to finish the Clock Croc for Peter Pan and Ariel for the mermaid section.
This island is slow. But it has been a good source of Gold and Diamonds. The Fairytale map does not use Energy; you are reliant on watching ads to get single items, daily freebies from the shop, and cross-over chests or other items from the other islands.
Day 15
Things have really slowed down. It took several days to reach level 15, and I now only have 15 days left on the offer. I think I may only get to level 18 before I run out of time. I have not purchased the $20 or $30 items. I am still on the fence about dropping that much money on the offer.
Day 16
I bit the bullet and made some additional purchases, including unlocking the small part of the map with the Diamonds for $3.99. This brought my total spending to $21.45, and it checked off the goals to “unlock land” and “spend $19.99.”
So, if you miss the keys offer or don’t feel it is worth it, you can still spend $30 to get all the spending goals. You could even buy 6 maxed-out piggy banks for total efficiency (4,800 Energy).
I would much prefer versions of this offer to include easier terms, such as collecting Lovers or completing Campaign levels. As things stand, the offer is mostly about spending money to reach VIP goals and Power Ratings.
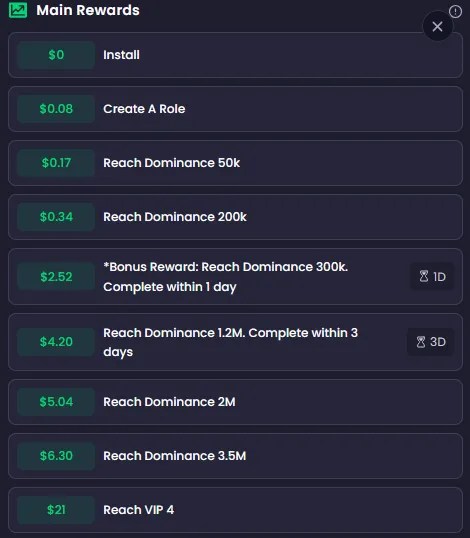
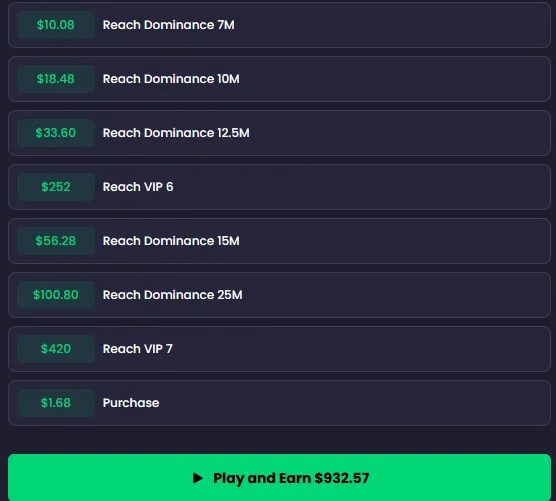
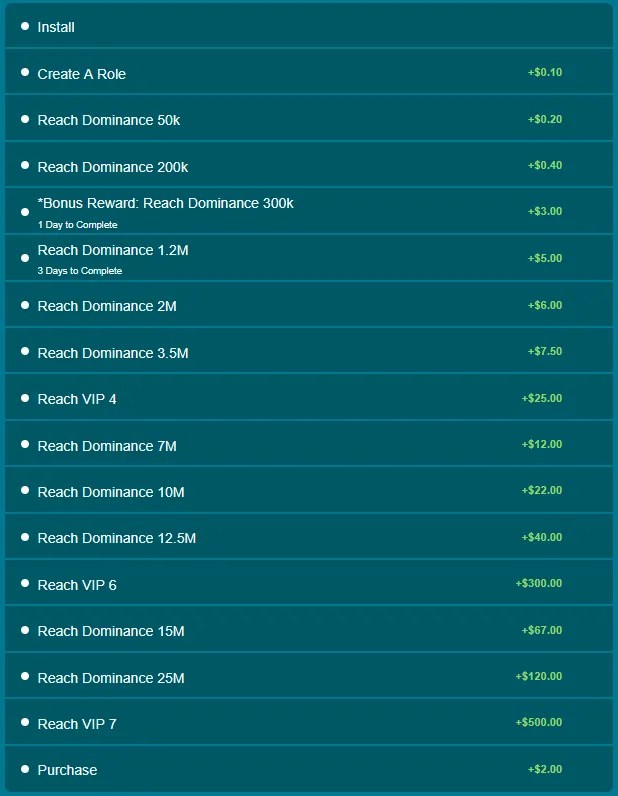
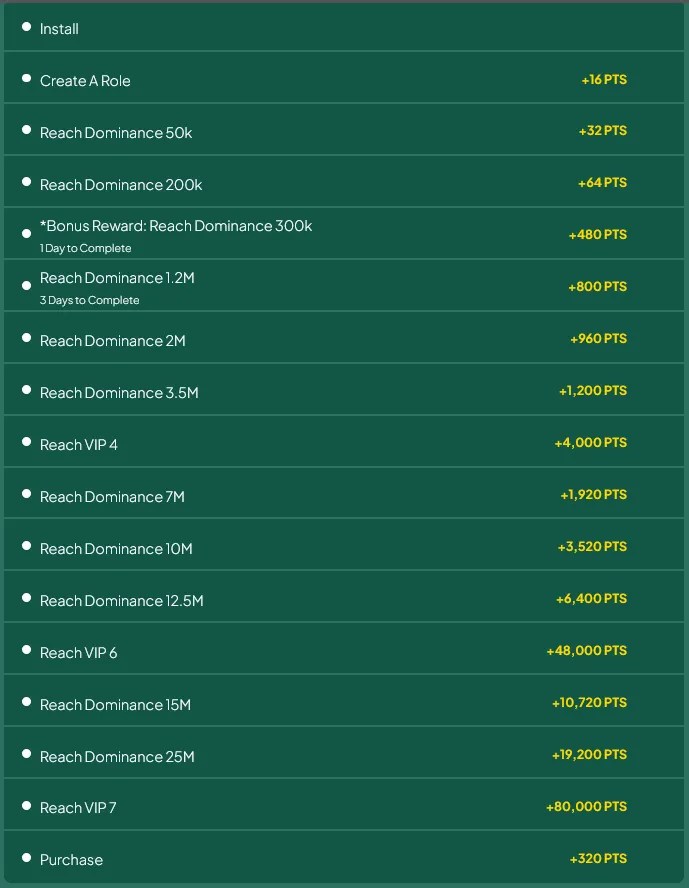
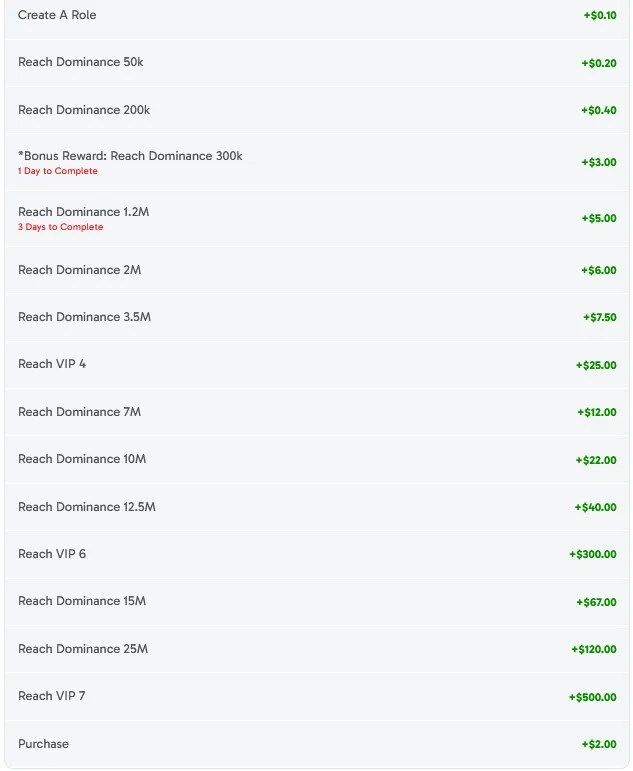
As of 03/2026, reach the subsequent events listed to earn up to:
The 2024 chart ended at reaching 12.5 million dominance (the old term was Sovereignty). In 2025, the list capped out at 25 million, and they added level 7 of VIP as a final goal.
Reaching the last two objectives within a time limit of 15 days is really not feasible, in my opinion.
The time limit was previously set to 15 days. The new offer allows for a total of 30 days. So, I think it would be possible to reach some of the lesser goals.
I only made it to 1.58M Sovereignty ($4.82) after playing for 8 days. I’ve done much better in other games that use this format, such as King’s Throne and Game of Khans.
Your Sovereignty is the sum value of the Warden, Lovers, and Heirs stats. All you need to do for this offer is boost your Warden’s stats via in-game items and leveling them up.
Lovers and Heirs will provide minimal improvements to your Sovereignty score.
You will want to use Skill books to raise the stats of your Wardens. Each hero has one or more skills that they specialize in.
Some Wardens are “jack-of-all” types, such as Camilla, and these can be fed any type of Skill book.
We will want to level up our Wardens to level 30 for the Economic types (Allure, Intel, Spirit) that boost our resource disbursements.
The Strength types will be used for combat, especially in Campaign and PvP, so let’s level these heroes to 100 and promote them when able.
Other than that, you just need to clear mission objectives. Completing your Daily Tasks will reward additional items.
Mostly, we want to get skill books to raise the stats of our Wardens, which in turn will raise our Sovereignty score.
Resources
The game uses 3 resource types: Blood, Dark Blossoms, and Bats. The Blood is used to level up our Wardens, and the Bats are used to clear the Campaign stages.
Clearing the Campaign stages will be the primary source of EXP for the player. As our Player increases in level, their court rank will improve.
This court ranking function is used in some of the mini-games as a way to “boot” out lower-ranking players.
You can collect Resources in your Castle. Initially, the resources will refill every minute, but this timer gets extended as you increase in level.
But, you also get more distribution uses at higher levels. The amount of resources you receive depends on the associated stats from your Wardens.
Dark blossoms are used in the Masquerade to keep your Luck value high. This increases the chances of encountering one of the potential Lovers that can be unlocked via Masquerade.
Some take 5 encounters, while others need 10 before they will enter your harem. If you encounter a Lover you already have in your harem, they will receive one Intimacy point.
Wardens
You can further boost the stats of your hero by using Skill Scrolls to improve their specialist skills.
Each skill can have 5 possible ranks, although, in the beginning, you will only see 3 ranks available.
The success rate on the Skill Scrolls is 100% for first-rank skills, 50% for second-rank, and 33% for third-rank ones.
I would suggest avoiding the allure of gambling on success with the 33% skills and instead simply do the 50% or 100% skills.
You can use the Training function to improve the more difficult skills without a chance of failure later on.
The next way to improve your Warden’s stats will be to unlock their mates. Each of the Lovers has a matching Warden, which you can view from their profile page.
The synergy effect can be boosted on the Bond screen, and this will, in turn, improve your Sovereignty score.
VIP
Each day, you can receive up to 18 VIP points from completing the Daily Tasks. The first VIP level requires 499 points.
VIP 1: 28 Days
VIP 2: Days?
The VIP function is largely intended for “whales,” players who spend tens of thousands of dollars on mobile games.
Whenever you see a game offer that includes an objective to reach a particular VIP level, understand that it will cost money, and like far more money than the offer rewards.
You can find a full chart of the costs associated with similar games on the GoV Wiki.
My Experience
Progress
When I originally did this offer, the terms were to finish in 15 days. I gave up after day 8, when I realized how insane the scoring system was.
Day 1
I managed to reach 140k Sovereignty on the first day and cleared chapter 13 of the Campaign. However, I was prevented from getting further by one of the missions that required the player to complete a daily action twice.
I saved up my Diamonds from completing Daily Tasks and then used them to purchase the Advancement pack, which included lots of Blood and Bats. I unlocked two Training slots for Wardens and two slots for Children. I also got 5 Lovers added to my harem.
The server reset time was at midnight for me (EST). This was nice since the last game offer I finished (Sea of Conquest) used an international clock and had inconvenient hours.
Day 2
On the second day, I reached 300k Sovereignty; however, because I was going too fast on the offer, I lost track and did not receive credit for the 200k objective.
I was once again stopped from further progress when I reached mission 154, which required a daily function.
Day 3
I managed to hit 455k Sovereignty today, and my Lord level is 5 currently. Total Power is 209.78K, and Intimacy is 226.
I have placed all of my Intimacy items on Alexis, the starter bride. I do not see any of the usual undressing mechanics in this game.
But those may become available later on.
Day 4
Pretty much uneventful. I did run out of Nectar, though. I had set the Masquerade to auto-refill using Nectar to improve my Luck stat. I forgot that Nectar is used to recruit Bats.
I also noticed that my Spirituality score was higher than my Intelligence, which meant that I was using more Nectar than I could generate.
So I have stopped improving the stats on my Spirit Wardens, and now I am only boosting Strength and Alchemy.
Day 5
I’ve been doing the Fishing and Bat attack minigames in the Dark Temple.
They give me some meager rewards, but it gives me something to do while I wait for more Bats.
My Sovereignty has hit 755k, and I am beginning to rack up undefeated streaks in the Arena as my Wardens get stronger.
Day 6
I’m up to 980k, mostly because I had forgotten to spend my Lovers Affinity points. These points can be used to gain a percentage boost to the primary stat of the Lovers matching Warden.
I received around 20-30% extra points from 7 of my Wardens, which came out to be around 125k points.
I think maybe 2 days ago, I gained access to the Conclave, which hosts the Assembly. This is just a sit-down game where you can bump off players of a lower ranking than you.
In Sultan and Khan, there were never any seats, and you were always getting bumped off when you did find a spot.
But not in Game of Vampires. There is always plenty of seat space, and I have only been bumped off a single time.
The benefit of joining the Assembly is that you can spend your accrued points on a bonus for all of your Wardens. I chose the Alchemy boost and managed to clear the first ten levels of the skill tree.
I managed to get an extra 1.8k Intellect on all of my Wardens and an extra 6% Intellect from consuming Alchemy books. With 22 Wardens, this came out to a total of 39.6k points.
Day 7
I am now up to 1.1M Sovereignty.
I finished the first week of events and received the Lover Inanna, who matches with Gilgamesh, who is an Allure/Intellect Warden. I now have a total of 9 Lovers and 23 Wardens.
I unlocked the Underworld, which is a mining function where you dispatch a crew of Wardens led by one of your Lovers.
The Wardens will earn Talent points, and you can get various small item rewards.
Day 8
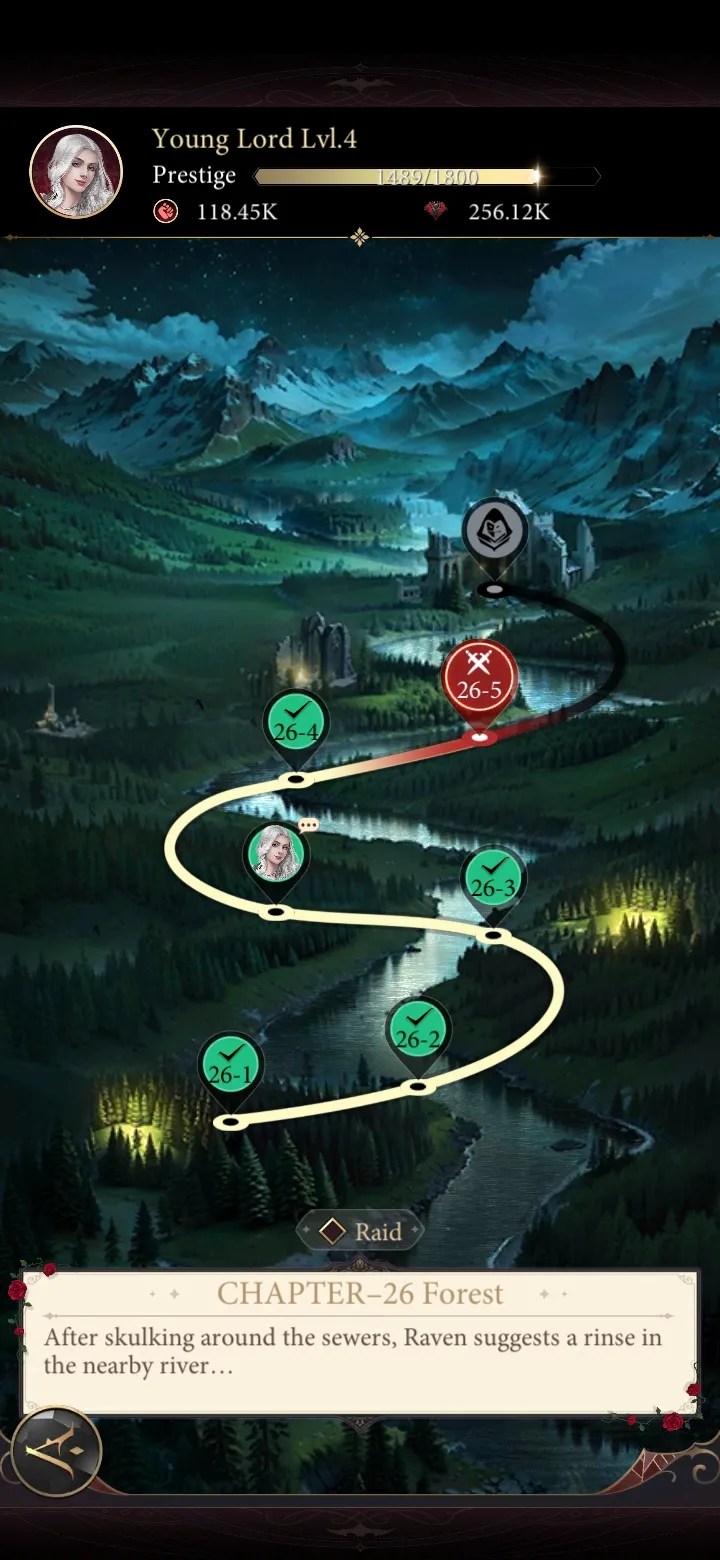
I finally hit 1.2M on my Dominance score. My Power is 386.09K, and my Intimacy is 519.
I’ve been putting all of my Intimacy and attraction items on Alexis, and she is now at Tier 3: Heart’s Desire. The higher your Lovers’ rank, the more Attribute points your Children will get when they level up.
The progression of earning Sovereignty/Dominance points has really slowed down at this point.
I am not sure if I can make it to the next goal in the 7 remaining days for this offer.
Unfortunately, so far I have only earned 450 points, which is equal to $3 on MyPoints. So this offer is really not worth doing.
The End
On day 14, I had a total of 1.58M Dominance/Sovereignty.
Not enough to get any of the higher rewards. I think that spending money on this game is the only way I could get any further on the offer.
My total from working on this offer has been $4.82. Definitely not worth the time spent playing every day for two weeks.
Heya there! So you have probably seen this game on top of the games section and you’re thinking ‘wow that’s a lot of money’ I wonder if it’s possible! Well I just spent nearly a month with it and I can say that it… kinda is? There are quite a few disclaimers that I would like to make before starting this guide that you will need to know. I think there were mainly negative responses on this game from the other reddit posts which were very much justified, but I would like to give people a fighting chance against this game if they still want to try it out.
Additionally I tend to make mistakes a lot so if you have played it yourself and see something that you disagree with, let me know! Last thing before we get started, I made many many mistakes on this game, some harsher than others. I will make these apparent in the guide so that you don’t lose a lot of progress. I will label these as Pitfall: so keep these in mind.
Disclaimers before you think about playing:
This is going to be a very long guide since this is comprehensive. I will probably hit the character limit on this so further guide will be on the comments below this if needed.
I was rotating this game along with about 4 other games at the time (State of Survival, Hero Wars, Merge Dragon, Travel Town) so you don’t need to check on it 24/7, preferably you want to reserve at least 10-15 mins 4-5 times a day to do what you need to which will be specified later in the guide.
I had a HUGE boost with Anniversary event which handed out talent scrolls out the wazoo (~300-400 50 exp scrolls altogether, you probably don’t know how powerful this is but again will be specified later. This totaled to probably 1.5 million – 2 million dominance ALONE.). Without it, you would probably need to spend somewhat more than what I spent (~$20) to reach 15 million dominance. However, optimizing my mistakes might make up for some of this.
Oh yeah this guide is to 15 million dominance. Vip levels are not worth it (For reference, as of writing this guide, you only get half money back for reaching those VIP levels). 25 million is REALLY not possible without spending a horrid amount of money since you only get a month’s worth of time to reach 15 million. So in the end, the total money should be $240-$250.
Time zone matters. There are certain things that pop up daily that only occur for 1-2 hours and missing them can build up to a lot of dominance lost (possibly 300k upward). I feel awful for saying this but you may need to change your sleeping schedule a bit to accommodate this game’s timers depending on when things pop up for you.
You may need to communicate with people but be careful. There are a lot of Discord scammers in the chat. Just do enough to get yourself into a good guild. Being in a good guild is so so important. I will talk about guilds more later on but you should try to at least get into top 2-3 guild.
This is a competitive game. No doubt about it. How well you do additionally depends on how tryhard the other players are. There are constant ranking events that give you critical rewards based on how well you do. Your goal is to aim for positions 11-20 optimally (but you shouldn’t go out of your way or spend money) since top 10 will be whales. So in the end, there is some luck to that as well.
As mentioned earlier, if you want to hit the big bucks. You will NEED to spend. The goal here though is to optimize our spending because there are some money sinks that will completely waste your money for almost 0 return. One of the hardest things about the game is knowing WHAT to spend your money on and there were some much more worthwhile purchases than others.
Alright, all settled in? Feelin pumped yet? If you’re still not sure, try out the 1.2 million dominance in 3 days goal. If you can manage that pace throughout the entire run, it should put you in a good spot (read this guide before doing so though!). Alright, it’s time to walk through the game.
I realize that reddit sucks with inserting images in posts so here’s an imgur album of ALL the images you’ll need (hopefully it will stay up). I will walk through them sequentially.
Take a look at the first three images. That is your entire base. There are a LOT of menus and areas to go through (though that’s the whole goal with games like these) so we’ll walk through them one by one, aight? Sounds good? Ok. We’ll start with the 6 menu tabs at the bottom of the screen.
Bottom Tab Menus
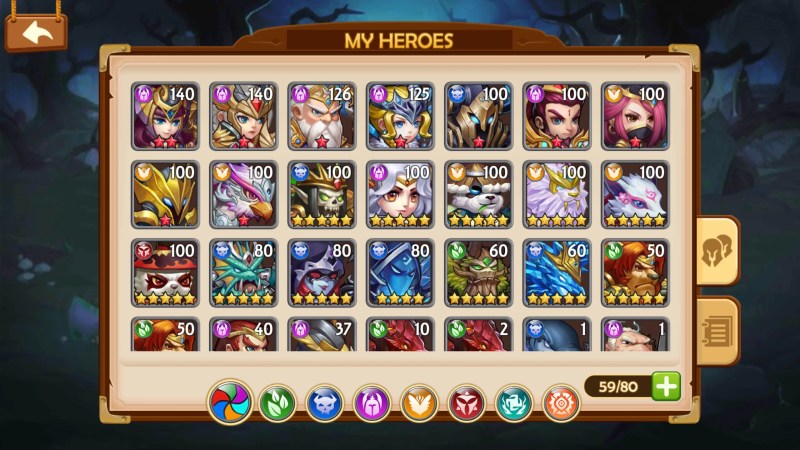
Wardens: Your characters. The majority of your dominance power. Personally speaking it should comprise about 50-60% of your dominance at the end of the run. You will be on the screen often. When you click on a warden, there are a lot of things to keep in mind. Note that wardens have different rarities and have symbols focusing on certain affinities but that does not matter. These only dictate starting talents and their distribution and for the REALLY high rarities, you can get an aura which will boost attributes for all wardens. However I was only able to get one warden with an aura via Macabrian coins. This means that at the start, high rarities are stronger but still grow the same and the difference between them fizzles out the more you invest in talents.
Details tab: Wardens are primarily leveled up via a blood system. There are ascension checkpoints at levels 100, 150, 200, 250, 300, 350, 400. For a months run the only checkpoints you care about are up to 250. The more blood you can get, the more dominance you can get, simple. You can ascend these wardens utilizing equipment primarily gotten from ranking events and guild coins. They are hard to get otherwise. This is why it’s important to join a guild early. Ascending a warden gives them some talent points so that you can level up a talent and raises their blood level and talent level cap. You will also see that a warden also has its overall attributes broken up into 4 different categories: strength, allure, intellect, and spirit. Leveling a warden up will increase all of these attributes based on their talent level for each attribute.
Strength reduces bat usage when exploring but also will allow you to defeat final boss at end of each chapter. Decently important but not a priority. Strength increases their warden power which helps your combat in arena, exploration bosses, etc. Talent levels are the best way to increase warden power. Blood Levels and strength books help but only at a fraction of the ratio and they do little to increase warden power. Note that strength from other sources do not affect warden power. Keep this in mind as warden power plays a decent role in many activities.
Allure gives you more blood. More blood = More upgrade. More upgrade = More domination and more allure. See where I’m going? FOCUS ON THIS.
Intellect gives you more nectar. Nectar is used to produce bats and give pet food. Other than that it is basically useless. Do not invest in this.
Spirit gives you more bat but since it consumes nectar, having more spirit than intellect can be problematic. Still, do not invest in this unless your back is up against a wall for bat usage (which is nearly never)
Talents tab: Possibly the most domination heavy area. Talents are super important. They basically represent your ‘base stats’ and stack multiplicatively with the levels you get from investing blood in. Wardens can have anywhere from a 1* to a 6* talent. However these only dictate the maximum dominance capacity and you will never hit that. You should be focusing on 1* talents always unless you have an excess of talent points. This is because there are three ways to upgrade a talent, but only two are really relevant: scrolls and talent exp. Talent exp is guaranteed but you need a lot of exp (200 for 1*, 400 for 2*, etc.). For scrolls, it is rng (100% for 1*, 50% for 2*, 33% for 3*, etc.). Granted, the expected value should balance out in the end but I don’t want anyone to suffer through rng hell.
Pitfall: I invested scrolls into 3* talents and rng fucked me haha
Pitfall: I invested talents into spirit at the start, you should **almost always invest allure 90% of the time, 10% strength for exploration purposes (**Note that this only applies to talent exp since talent scrolls are already predefined with their category: strength scroll, allure scroll, etc.).
Importance of investing in one character: Due to this multiplicative stacking, it is best to dump all talent sources and blood into one character. Carmilla is an excellent choice and your starter character since she has 1* and 3* talents for all attributes if you have that much talent exp. Granted it is not that simple: The blood to stat ratio gradually falls off as you level more and more, so once you have adequate blood production, level up all your other wardens. You can see in the imgur gallery that my Carmilla made up over half the dominance alone. There are MANY other benefits that come with tossing everything into one character like your favorite pokemon which I will go over later but here’s the general overview since your character is so fucking strong:
Guaranteed arena wins (For talent exp)
Guaranteed underworld spot (For talent exp)
Guaranteed league win (For talent exp)
Revival exploration tactic with valiant slates (For talent scrolls, see what the main goal is here?)
Skills tab: Mostly irrelevant since its used for arena and underworld. Bonuses suck (Doesn’t help characters that are struggling and your big strong warden doesn’t need them) and do not contribute to your dominance. You can ignore for the most part.
Skins tab: Completely irrelevant unless you are a heavy spender. Skins provide talent bonuses once acquired.
Boosts tab: This is where you spend boosts and talent scrolls. Books are flat bonuses to stats (and therefore domination), and talent scrolls give you talent exp to upgrade your talent.
Pitfall: Since books are flat bonuses unlike the stacking between levels and talents, you should use them to strengthen weaker characters for arena/underworld/catacomb purposes. I funneled it all into one character.
Story tab: If you want to read. I guess. But you’re here to make money!!!
Lover tab: More on that later.
Ok that was a lot but other tabs will be shorter!!
Bag: Holds all your stuff which are all consumables. You should be using stuff in your bag when you can with the exception of conclave standards since they are pretty valuable.
Tasks: This is where you will do your missions for rewards. This is divided into two categories:
Daily tasks: Daily missions. Do enough of the missions so that you can get to 125. Gives a very small source of vip points, occasional diamonds, talent material, and decent source of blood as well as miscellaneous things.
Achievements: These can propel you quite far in terms of resources but they will come naturally with your daily gameplay. Don’t force yourself to get them unless its the dominance one which gives you a large amount of blood or the friends one which you should get free gems out of instantly. Send friend requests to as many people as you can for free gems. Fill out that friends list.
Friends: Friends list. I did not talk to anybody but it may be helpful. If you want you can block the scammers.
Market: Important tab. This is where the “what do i spent my initial shit ton of diamonds on” comes in. And the answer is…. basically nothing in this store! The only thing that is worthwhile is the valiant slates in the item store. Nothing else. And even then you shouldn’t spend on it unless you have to.
Pitfall: Guess why I’m saying this hahaha. Yeah I wasted a lot of diamonds here in the name of experimentation (~10k). The rush packs are kind of mediocre in terms of value but I’d say that they’re the second best pick in the market. Only spend on these on an emergency. Still I spent way too many diamonds on the rush packs that could’ve been used elsewhere.
Explore: For a decorated tab there is not much to it. This is where the main story is. You spend bats to progress. Bats are kind of like your stamina for exploration. It gets very costly later on but you do NOT need to rush through the main story midway. You SHOULD rush early on since you are trying to build blood production as fast as possible. However the strength requirements for bosses late get really obnoxious fast so you don’t need to rush bat production nor force bosses if you don’t have enough strength. Just build up. Each chapter runs the same. There are 5 sections where you defeat enemies, each progressively getting more costly in bats but will reduce in bat consumption at the start of the next chapter. At the start/middle/end of each chapter are story bits which I skipped completely. At the end is a boss. If you meet the warden power requirement then you can kill the boss. If not, you can either wait til you have enough or fight the boss then wait for everyone to revive the following day to deal the finishing blow.
Valiant Slate Strategy: However, once you have enough resources invested into your warden and are late enough into the game (the warden should hopefully be someone like carmilla), you can do a valiant slate strat where you full send everything to the boss and instead of waiting the next day, use a valiant slate to revive your character. This should be only area where valiant slates are used. Any other areas are a waste. Since most of your warden power is on that character and a valiant slate can only revive one character, this basically gives you a second chance at the boss. Only do this strategy if you are both within one hit and your warden power is extremely far away. You should only be performing this strategy second half or last third of your run since this is costly for diamonds (150 diamonds) but gives good payout since each chapter gives you 50 diamonds back + a talent scroll in the achievements tab. Otherwise, I wouldn’t suggest this unless you need the rewards.
Pitfall: For reference, I invested in spirit early on and I had like 200 million bats (At the chapters I was at, that was like 20 chapters worth of bats being held up from being consumed since I couldn’t meet warden power requirement to kill the bosses in one hit). This is why you should almost always invest allure.
Pitfall: I used valiant slates with guild activities and wasted like 450 gems worth there for pitiful benefit.
Alright. Still with me? That was a shit ton of info but we aren’t nearly close yet. Tough offer to swallow but I think its worth if you can go the full mile.
We’ll tackle the buttons all around the edges then move on to the major buildings.
Left/Upper/Right Tab Menus
Story Mission Rewards: There’s a small tab with a red exclamation point on the left side in the main menu. Those are your story missions basically. The only thing that really gatekeeps you in those missions are the nightclubs trists (since you can only do 1/day) and the chapter completion requirements. They give you small rewards but they build up nicely over the course of your run.
Feature Rewards: On the left side of those missions is a small button with a present symbol and a piece of paper. Those basically give you rewards for unlocking new buildings. Free stuff.
Mail: Moving slightly above that is a small tab with mail symbol. I used this a few times for beginner/update rewards.
Ad Rewards: Should be part of your daily routine. Watch ads 5 times a day, 10 minute cooldown between each. You will get 100 gems, 25 prestige, a random talent scroll that sucks, free 1k dominance book, free resource collector for castle, free dating can, and intimacy gift box. Gems are the most important thing you get. If you are pressed for time and can only watch for a little, resource collector, dating can, and book are important. The other two suck.
Pitfall: I got lazy and did not watch all ads daily. This can hurt you slightly but not a huge deal if you miss one or two every so often.
Community: Where the update stuff is. I didn’t really talk so wasn’t really useful to me.
Pitfall: On these community posts, if you engage (like/comment stuff), then you will receive a prize within the week. I did receive it one time but again I got lazy on it since I didn’t feel like talking. More free shit if you wanna engage with these posts.
Events Tab: This is an important one. This is located on the top left of your main screen. Clicking on it will get you to all unlockable events at the time. They are all basically timegated so you HAVE to stay on top of these events. They don’t take very long. As mentioned earlier anniversary is a special case, I don’t know if you’ll have this but likely not. Optimize your time with anniversary if you can get it. Same with clockwork fortune, it’s an ok spot to dump your gems into. If you have anniversary though, SAVE YOUR GEMS FOR IT to increase your power. Again, this event is such a massive power boost if you have access to it.
The other events are very normal. They rotate somewhat weekly with a ranking reward at the end depending on how you did. Again, #11-20 is optimal if you’re going f2p/dolphin route (But let’s be honest you aren’t going f2p with this game unless you are satisfied with 7-10 mil). However on some events they suck (Intimacy especially) so don’t bother and you can settle for like #21-50. They rotate between increasing a specific aspect of the game, whether it be talents, domination skill points, intimacy, etc. In this events, just spend 200k blood (which will be absolutely nothing a week into the game) to buy the free stuff (and your blood will basically be refunded from the rewards anyways) and just consume it in the event to get your free stuff. On the left side of these normal events is a tab that gives you a small amount of free stuff based on the number of points the serverwide players have gained. The only important reward from these events are the points you get from consuming those event items. There will be a redeem tab. Get the talent scrolls and only them. Talents are a high priority since they scale well late into the run. Other than that you won’t be interacting with these events much.
Limited time packs (Diamonds/money): Rotating onto the upper side of the tabs, we have the limited time packs. These will appear “conveniently” whenever you don’t have enough of something. You can abuse this to your advantage. This will give you packs ranging from $0.99 to $9.99 packs generally as well as diamond packs. DO NOT BUY THE DIAMOND PACKS they are generally a waste. $0.99 packs are the best value generally and you should try to aim for resource collectors by using the collection button when you don’t have enough collection charges. If there has been enough cooldown, the offer will pop up. I would only suggest buying these once you have a good idea of how you feel about your time left vs domination needed.
Things worthwhile to spend on: While we are on the topic of spending, we should dive into this more. I know that I have been saying ‘this is bad to spend on’ a lot, but I haven’t really mentioned good spending areas for diamonds/money. So here are some good ones.
Anniversary if applicable (diamonds): I will keep bringing this up since this is so good but spend money for hitting power during the festival fun section of anniversary. It gives you a crap ton more stuff.
Allure rush pack (diamonds): Most rush packs are mediocre EXCEPT this one. Gets your blood production up and running fast. If you look in the item store section of the market, a scroll is 500 diamonds. However these packs give you a scroll + some books for 380. Much better value.
Pitfall: I may have wasted 500 on some of these scrolls instead of the 380 packs. Additionally I spent too many diamonds on the strength rush packs for exploration purposes (7k). Go for allure instead.
Growth rate packs for ($0.99 + $4.99 version): These give you insane value, buying these gives you 10k+ diamonds and some other misc stuff to help you along. For reference, $4.99 in regular diamond shop with 200% bonus gives you 500 gems. Absolute joke compared to these growth rate packs. DO NOT BUY THE $19.99 version it sucks.
Beginner bundle with Victor/Victor’s lover ($0.99): Gives you more good stuff for $0.99. You get a crate which gradually upgrades once you get to certain prestige ranks and having another warden is good for upgrades that apply to all wardens which will be applicable later in the guide. Victor’s lover also comes with a good intimacy base which will help with dating.
Special pack with Frederick/Frederick’s lover ($9.99): Significantly lower efficiency than the last bundle since it comes after you buy the beginner bundle. However if you are in a dire emergency and you have like 300k-500k dominance left this can help push you much closer to the finish line. Comes with allure books/talent scroll and 500 gems.
Personal Assistant ($0.99 for 1 week): Helps you collect resources, date, train, etc. basically most things while you are offline. Normally I would not suggest these since you can do most of it yourself but most people are very busy and having these takes off 80-85% of the stress of your shoulders so you don’t spend upward of 30 mins many times a day collecting shit. Additionally this prevents anything from overcapping. Additionally on the offchance you find a waifu/husbando for this game you get to see them on homescreen.
Pitfall: I did not buy this for my first two weeks. A lot of blood/nectar/bats were wasted since I was sleeping so much (ehe).
$0.99 purchases for VIP level: You get a lot of perks for spending. You really want to try to comfortably arrive at vip level 2 (but not instantly due to the lover, explained later) since you get really nice perks that will save you some time (fast dating/masquerade, etc.) and you can go and do other stuff. VIP level was either $15 or $20 I can’t remember. Best way to go about this is $0.99 purchases. You get bonuses for making purchases daily such as diamonds and event items. How much you spend matters but there are some rewards that are based on if you just spent that day. Thus, $0.99 purchases tend to be more optimal which is why they are mentioned often. A week or two in, you will quickly start to see which $0.99 purchases are more worthwhile but I would start with resource collection charges that you should save for when you have much higher blood production. DO NOT MAKE A VERY LARGE PURCHASE EVER IN THIS GAME ($14.99+).
Try out these purchases at first (Mainly the $0.99 ones). Once you see the value these bring, you can quickly start to rule out how inefficient most other purchases are and begin to make much smarter spending choices. There may be some events that I was not able to see in my playtime so hopefully this helps guide you in those situations.
Summon: Irrelevant until your 80%-90% mark into your run. You should have enough red Macabrian coins from ranking so that you can get yourself a warden. Go for Woden since he’s the allure category and has allure aura that will boost allure of all wardens. Good deal. On the off chance that you get enough Macabrian coins for two of these guys, go for Rudra as your second since strength will always have some relevancy. I could only get Woden.
VIP: Already talked about, just make sure to collect your rewards once you achieved the respective VIP levels there.
Store: The real life money equivalent of the market. You should buy basically nothing in this store until you are 98% certain that buying something from this store will push you to a checkpoint that will massively boost your dominance. That was basically nothing here.
Bonuses: Relevant only for the purchases mentioned above. Get your personal assistant and growth packs here and get your bonuses for purchasing in general.
Pitfall: Not needed but you can invite friends for rewards; the higher rank they get the more rewards you get. But uh. Yeah that’s hard isn’t it. I guess you guys are friends with each other on this sub! I think? Anyways help each other out! I had no irl friends that played this with me so that’s skill issue on my part.
Ranking Event: Where you get your rewards. You really wanna score high on these without going too far out of your way to place. Some days you just score below 50 or below 100 and you gotta accept that. Take the wins you can get. Warden equipment is gained here as well as talent scrolls, diamonds, and other stuff. Some of these are based off guild ranking so again try to get yourself into a good guild.
Timed tasks: Usually based off the event running but these are more of ‘rebate missions’ that last for about a few days to a week. Increasing your dominance, spending diamond, etc will give you rewards. Honestly they suck unless you hit the higher tier rewards within the time limit but try your best! You can also save your consumables to hit these higher tiers but up to you. Would not focus on this too much.
Alright cool, that’s our side tabs. One last thing to mention before heading to the main buildings is lord level:
Lord Level
I called it rank earlier but too lazy to fix ehe. You get more collection charges the higher your rank is but that doesn’t matter. There are two important things you can get from increasing it (using prestige). You can get more wardens. More domination. Additionally, you have a higher chance of keeping your conclave seat. Conclave is possibly the riskiest part of the run and keeping your lord level + prestige high can minimize the risk. More on that later. However I found that after venerable lord level 1 it became annoyingly difficult to raise so I didn’t focus on it after that. Hitting these lord level checkpoints also advances your growth packs. You can get prestige by doing story, underworld, cursed ruins, and guild store.
Alright time for main buildings. I’ll be going from left to right of the main base. These are the main meat of your operations. Some are just plain useless however.
Buildings
Arena: You fight with your wardens to get talent exp. The talent exp gained is extremely minimal unless you can win a fight against most/all wardens. You can get about 50 talent exp a day about on your main warden with this. However the warden chosen is random and arena can just be useless that day if you are unlucky. VIP level helps mitigate this but you eventually reach a point where you have so many wardens the arena becomes near useless since your warden pool is so diluted. Challenge flags (The orange ones) should be used towards your main warden to give the more talent exp. Still, use your attempts. Don’t worry about the buffs they don’t really matter besides the first. Don’t spend diamonds here.
Dark Lake Temple: These are the daily events you need to be awake for. Missing these can be moderately detrimental to your domination gain. I get that for some of you these may appear dead in the middle of the night so you’ll have to work without these. Both of these give you Dark Lake Coins which you should spend on Vito. Books are less optimal and plazma/beast just outright suck unless you get lucky with their respective child/event. Each of these also has a small chance of giving you diamonds.
Fishing: This is based off your warden power. More warden power = more rewards. However the reward requirements are exponential so don’t worry about it too much just collect your free stuff and make sure to hit your fishing timing correctly. You get used to it after a bit. Good source of blood. Fishing collection is useless.
Dark Chasm: Same mechanic of warden power as fishing. If you played through story mode bosses then it’s the same thing. Much better source of coins than fishing at the cost of no blood gain.
The League: This is more of a mid-late run unlock. You should not focus on this too much unless you have excess guild coins. Guild coins should primarily be focused towards prestige and equipment daily so its hard to justify participating in this since entry costs 600+ guild coins. Gives an okay source of talent exp depending on which level you participate in. Would not suggest though unless an event needs it and gives a good reward like the slot machine.
Cursed Ruins: Have excess bats and need some extra prestige and little other rewards? Go here! Late run unlock. Would not suggest spending past 3-5 million bats daily on this since that should be not that much to you once you unlock this. Decent early on for small talent exp and prestige but since rewards are exponentially costly it can be very easy to lose all your bats even if you have a lot so do not progress too far.
Pitfall: Why did I mention this? Well do you remember those 200 million bats I had earlier? Well. Rest in piece. :pensive: This was a very big mistake on my part and set me back a long way.
Catacombs: Early unlock. This is a feature that seems like easy rewards, but the requirements quickly get out of hand and requires you to invest towards 3/4 wardens. You should invest in 2/3 slightly more than the other wardens via books and stuff but most should head towards your main warden. Strength is the first requirement, then allure, then intellect, then spirit. I never even made it out of chapter 5. Scrolls are good from here but the amount of investment vs reward ratio can be very costly on your domination gain due to spreading out your resources. I would not focus on this. Take what rewards you can get as you progress and stop there.
Underworld: Easy talent exp. Starts off slow at first but once pvp zones are unlocked, this is a good source of exp for your main warden. If you invested in one warden like I said, you should hopefully steamroll the top level 5 resource spot and get almost 400 free warden exp if other people are not following this strategy. You also get buffs via diamonds (dont spend) and friends. Thus you should make friends with the biggest damn whale on the server and leech off his succulent 15% attack bonus mmmm tasty. Do not assign other wardens with your main warden since the talent exp will get distributed. As for your other warden teams (You get up to 3), you should have them focused on talent exp themselves on lower levels or prestige if you are lower than you should be. How can you tell? Conclave.
Gym: Early unlock, slow source of skill points and obnoxiously slow for talent exp. Don’t buy any slots here ever.
Conclave: As mentioned earlier, this is probably the riskiest part of the run since this is a pvp area with amazing rewards. There are tables that you can either setup or join. Setting up a table is very costly and you should leech off tables that whales have set up. You get some conclave standards (purple banners) early on I think but you should save them for an emergency (you CANNOT find a table that you can enter and you are about to go to sleep for the night). The way Conclave works is that once you enter a table, you can slowly get points to unlock upgrades for ALL wardens. These rewards spike your domination very heavily and not staying on top of this really screwed my run somewhat. However, what if the table is full? Well you can compete with someone granted that they aren’t protected (which won’t be the case unless you just entered the table in which case you would be protected for a few minutes). If you have a higher lord level or higher prestige in the case of the same lord level, then you can overtake them. Do you see why lord level is so important now? Your spot can frequently be taken over by whales. So there is a good chance that you probably won’t be able to get some of the highest tables due to having low prestige. That’s why you need to be better than most of the population so that you can still secure these spots. However focusing on prestige too much can negatively affect other aspects such as your allure gain so you have to balance it out. Try to hit the highest tables if you can and if you can’t get into a high table, just get into any table possible (preferably shorter if you are an active player). As for the points, you can spend it on four different branches, which gives strength/allure/intellect/spirit to all wardens. There are several pitfalls here, take note:
Pitfall: Not turning on notifications. I kept forgetting to turn on notifications and missed many potential points. There is a setting to notify you if your seat has been taken. If you see this, immediately go and get another seat as quick as possible.
Pitfall: Entering a low point gain table that lasts for a long time. If you can’t find a table and need to resort to a bad table, enter one that lasts for a shorter amount of time. Once you are in a table, you are stuck until it ends or someone boots you. This is so that you can scout again for higher tables quickly after while still getting some points. The exception to this is if you are about to go to sleep and will not do anything related to your phone for the next eight hours then it’s fine. I wasted a lot of points here.
Pitfall: The reward to point ratio has diminishing returns per page as most things in this game. Thus you should try to balance your point spending between all branches. However, keep the allure branch a page or two ahead of the other three. The beginning of the next page is where the exponential cost strikes, and the end of each page is where you’ll receive the biggest power spike. I was not focusing enough on allure at the time.
In the end you’ll have to try your best and work with what you have with the players around you.
Updated Review: based on changes from Update 67 on March 27th, 2024.
With this new Year of the Dragon coinciding with the 50th anniversary of the pen and paper game, we are seeing some wild new dragon-themed offers for the entire year.
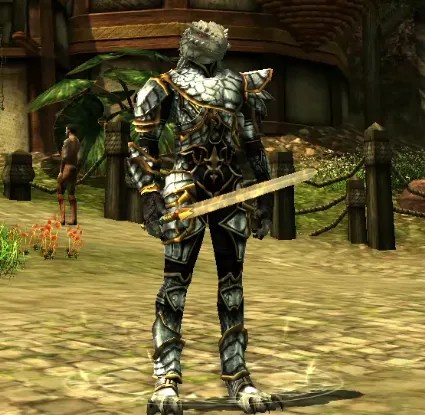
The new Dragon Lord archetype can be claimed in the Hall of Heroes on the bottom floor. The archetype uses the Fighter class as its base.
Update 67
Some additional notes are available from the update on March 27th, 2024. Update 67 included a new free adventure pack for level 18 Heroic and 34 Legendary players.
Update 66.1
A recently released update has corrected many of the minor problems that players were encountering with the Ravager enhancement tree for Dragon Lord.
I would say the class works best as a pure build. Your talents lie in how fast you can clear single-target enemies and your ability to stun large groups of foes, with no consideration for type.
Basically, if it is in front of you when you roar, it will be stunned.
I have seen some class combos running around the server. The most common one I have seen is a Paladin/Dragon Lord with Dragonborn as the race. The next most common was a Druid/Dragon Lord with Asimar as the race.
My Build
I decided not to use a true reincarnation to make my Dragon Lord. I created a fresh, first-life character, to try out the new archetype.
I was initially a bit concerned with the lack of healing, but I soon got used to using the crowd-control abilities and choosing my targets to make fights go fast and take the least damage possible.
Dragon Lord is designed to use either your Strength or Charisma score for combat and abilities. Due to this, it does combine very well with Dragonborn, Half-Orc, and the Purple Dragon Knight races.
Abilities
The primary ability you will use throughout your life as a Dragon Lord will be the Roar which becomes available at level three. It is a cone-shaped Tactical attack that extends outward a short distance. Anything caught in the blast must make a save check or be Dazed.
The DC for the roar uses a Base 10 + the higher of your Charisma or Strength ability modifier + Breath DC bonuses + Stunning bonuses. Roar is also listed as a Tactical ability, so it also gets bonuses from anything that boosts Tactical abilities. For example, Combat Mastery and Sundering, or any of the many feats available to fighters.
At level 5, an improvement to this ability becomes available. The upgrade will reduce the cooldown time, turn the Daze into a full Cower, and give you a 20% bonus to damage against Helpless foes.
Reapers cannot escape your roar either and will cower while you dispatch them.
Dragon Lords get an Imbue damage type based on their chosen dragon. I took the Black Dragon as my selected type and I also used a White Dragon as my racial type. This gave me energy resistance to both Cold and Acid which are more useful in the endgame.
Draconic Arms adds a 1d6 bonus to your damage per imbue die you have. You will also get Aura-based bonuses at three stages of your character’s life and these can be freely selected to customize your build as you increase in level. The aura’s is similar to a paladin’s aura, affecting group members that are within range.
There is also a companion ability like what the Halflings get. This will improve an ally’s combat ability for a short while. Later it gets an upgrade that turns it into a mini-heal with a Panacea spell that scales with your Melee Power.
Originally, this ability required you to be right next to your ally, and the animation would root you in place when you used it. However, Update 67 corrected the problems when using the ability and you can now use it on the move.
One of the Tier five enhancements will give you a +2 bonus to your weapon’s critical multiplier with any weapon you use. With my Khopesh this brought me up to an x5 on the multiplier without any other bonuses included. The damage numbers get very big very fast with Dragon Lord.
Survivability
The class includes the potential for high AC and Fortitude scores, especially if you combine it with the Dragonborn racial bonuses to Natural Armor. The Defender enhancement tree can bolster your health enough to cover a lack of self-healing ability.
Second Wind, while useful in a pinch, is hampered by its long cooldown. Your goal with the Dragon Lord archetype will be to crowd-control enemies and then clear the field
Conclusion
I like the Dragon Lord, but I strongly suspect we will see some balancing soon to level the playing field. The damage output is crazily high at the moment and far outstrips what other melee classes can manage.
The Roar will likely be nerfed. I mean why, is an emotionless creature like a skeleton or a golem cowering because someone yelled at it?