
I got the credit after submitting a ticket and proofs. My total earnings from this game offer was $13.19.
Final Update: Day 30
Last night with about 14 hours left on the offer, I was still in Una’s area. I realized I had miscounted the number of merges I would need to complete the Limestone and that got me thinking I could finish the offer in time.
I went all in and spent an additional $27.17 to purchase, two hero chests and 2,300 Gems.
I spent Gems to fast mine and build the remaining Limestone blocks.
I managed to reach Chapter 5 and Install the Drum, but I did not receive credit for the objective. I will submit a ticket in a couple of days.
The final objective is still not clear. I completed 5 quests and still haven’t encountered the last quest to, Clear the Trash. If I can get credit for the Drum, I will have a $10 profit for this offer.
Welcome to Fable Town! Merge, renovate, and discover the magic of Witch’s Garden!
In this engaging merge puzzle adventure, explore the wise witch’s grand mansion filled with secrets. Combine magical artifacts and enchanting plants to restore her beautiful garden.
Face majestic dragons and solve puzzles to reveal the wonders of this offline game. Use your merging skills to build a vibrant sanctuary and let your creativity flourish in a garden of surprises!
Join Ginny, Merlin’s talented granddaughter, as she returns to Fable Town to uncover the truth behind the enchanted fog and find true love.
Important Things to Know
- Must be installing Fable Town for the first time to receive SB.
- In-app purchases and upgrades are available.
- Award will pend for 10 days
- You must complete goals within 30 days of installing to receive Up to 9,909 SB
Offer Link: https://www.swagbucks.com/games/apps/1672106/fable-town?rb=69384823

- Important Things to Know
- How to Play
- Other Functions
- Fable Town Shop List
Main Goals
- Save Merlin +$0.09
- Rebuild Merlin’s Castle. +$0.19
- Renovate Library +$0.28
- Restore the Habitat (Morgana’s Location) +$0.47
- Clean the Garden Library. +$0.71
- Build the Altar. +$0.94
- Install the Water Wheel +$1.41
- Enchant the Tree +$1.88
- Rescue Una +$4.70
- Rebuild Water Sculpture +$9.40
- Install the Drum +$23.50
- Clear the Trash (Winter Queen Location) +$47.00
- Total: $90.57
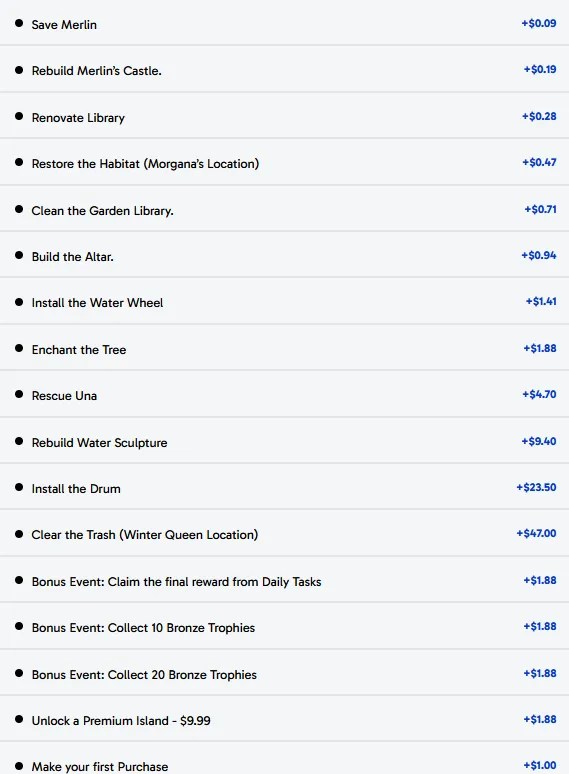
Optional Goals
The following objectives are optional and may require purchases:
- Bonus Event: Claim the final reward from Daily Tasks +$1.88
- Bonus Event: Collect 10 Bronze Trophies +$1.88
- Bonus Event: Collect 20 Bronze Trophies +$1.88
- Unlock a Premium Island – ($9.99) +$1.88
- Make your first Purchase +$1.00
- Total: $8.52
Buying Land
For the Premium Island, this just means unlocking a section of tiles on the main map. You need to spend at least $9.99 to clear the objective. I got the 10.99 Enchanted Treasures section. It had around 400 Gems and 600 Coins in it.
I strongly advise against spending 500 Gems on Lost Treasures. The items in there were barely worth 100 Gems.
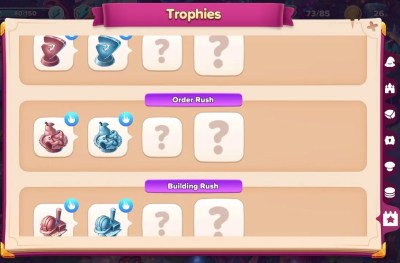
Trophies
Bronze Trophies are earned by completing the Rush challenges. You’ll get 6-7 of them. They fill up tiles but don’t give you much reward. There are 4 Tiers for each Trophy, but for this offer we won’t get the benefits of the upgraded versions.
TIP: It may not be necessary to do any side islands. The 3-day Rush events provide 15-18 Trophies, nearly enough to meet all offer terms.
These include the 3 day merge, build, energy, and crop events in the Main area and the 3 day recurring mini event running with separate event energy.
For the main area events, it’s usually rewarded on the 15th task, the last one. For the 3 day limited time event area, it’s either the 11th or the 15th reward
Warning!
If you use a Samsung device with Game Center support, the game ads can trigger “Instant Install,” (without consent) if you mistakenly tap the ad when trying to hit the close button.
How to Play
Fable Town is very similar to Mergeland: Alice’s Adventure, if you’ve played that before you will do fine with Fable Town.
– Сombine 3+ identical objects to get an upgraded one as a result of this fusion. It is better to merge items in groups of 5.

– Merge artifacts to disenchant wizards.
– Grow plants and trade fruits and vegetables for magic wands.
– Use magic wands to restore Fable Town.
Optional Ads can be watched to gain additional rewards. They can be skipped if you don’t like ads, or you can pay to remove ads (I advise against this).
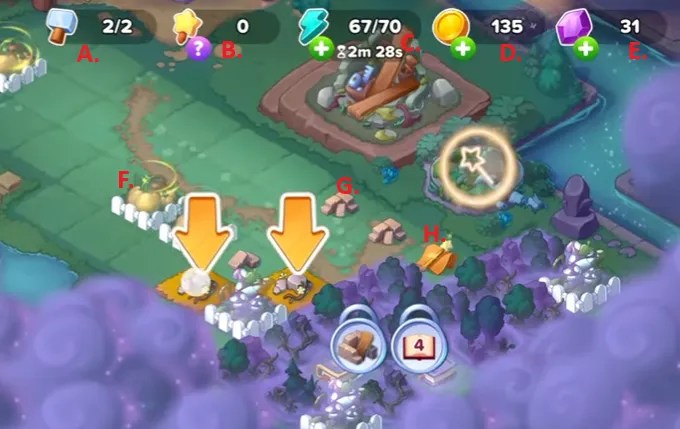
- A. Worker Elves
- B. Wands in Inventory
- C. Energy
- D. Coins
- E. Gems
- F. Pumpkin Patch (Produce): used to create wands.
- G. Stone: used to construct facilities (castle, library, etc.) on the map.
- H. Wand: are used to unlock new areas and land pieces, renovate the Elves House.
The Greenhouse generates some food and seed items for only 5 energy.
The Mine can also generate a smaller amount of seeds, it also make the Artifact and Construction Materials, so it is the preferred way to clear the missions..

Your character profile is shown at the top-left of the screen, below it is the current task list. Further down the left side of the screen you will find your Inventory and Daily Quests.
Produce, including Pumpkins and Mushrooms, takes 3 hours to produce goods. This can be sped up using 36 Gems. Produce field may be moved around the map. Produce can be exchanged for Magic Wands by the Elves.
Basic Stones have 8 tiers. Starting at the third tier, they will require construction using an Elf. They come in different colors depending on the Chapter you are in and have higher Tier levels.
Elf Tasks
Once a task reaches 30 seconds, you may skip the remaining time for free in the Task interface.
The task list from the Elves will often ask for foods you don’t have.

You can tap the Trash button to ask for a new task, this will start a two minute cooldown. There is no penalty for throwing out a task.
Some tasks will offer the same reward but accept different amounts of items.
| Tier (Time) | Requires | Reward |
|---|---|---|
| 1 () | 2 Items total (Pumpkin, Pear, Berry, or Mushroom) | 1 Basic Wand, 1 Energy, 10 Points |
| 2 (10 min) | 4 Items total | 2 Basic Wands, 1 Energy, 20 Points |
| 2 (20 min) | 6 Items total | 1 Ore 1 Basic Wand 1 Advanced Wand 30 Points |
| 3 (30 min) | 11 Items total | 2 Ore, 2 Advanced Wands, 1 Creature Orb, 40 Points |
| 3 (30 min) | 11 Items total | 2 Ore, 2 Advanced Wands, 1 Energy Orb, 40 Points |
| 3 (25 min) | 11 Items total | 2 Ore, 2 Advanced Wands, 1 Fauna Box, 40 Points |
Tips and Tricks
- Try to limit spending gems and coins for daily quests (spend 5 gems get 7 in return). They are best saved for buying Energy and popup offers.
- The Daily Reward objective requires you unlock Daily Quests and complete them 5 days in a row. It is advised that you start the game in the morning so you have time to clear the beginner quests and unlock daily quests. Daily Tasks become available after completing the Boot Camp.
- Claiming the Free Chest is a Daily Task. If you accept the chest before completing the Boot Camp, you will not be able to complete the Daily Task on the first day of play.
- In the Shop, there is a green button for “Free Gems,” this leads to TapJoy offers that may be completed to get Gems.
- In the Shop you will find free items available every 6 hours.
- This game does not use Codes, instead they offer Daily Freebies through MY.GAMES Market. Your Player ID is found in settings.

Tips: Event Islands
- For the Event area (Peacat/Mammoth), DO NOT merge the chests. Spam the 2 hit obstacles + 15 energy mine. Because you get points from merging objects, so 5 of low level objects would yield more points than getting 3 of the next tier.
- For the Event Islands, only the primary creature provides a reward, other objectives are optional. The Bronze Trophy is earned early, but if you clear all 32 stages, you get a giant Gem and Coin Chest.
Tips: Chests and Energy
- The contents of a Chest will be converted as you advance to new areas and will include items for those new areas. Leftover items will also convert, however, if you have not opened the next area, then the old items will turn into Coins.
- Energy may be purchased in the Shop for 350 Coins (90 Energy) or 90 Gems (100 Energy). You may also watch two Ads to get 30 Energy.
- The Energy Lotto is only available during set periods of the day, however, you can skip the timer for 45 Gems or 175 Coins during Rush. Completing the lotto is required for the Daily Reward objective. I saw (12pm-3pm) and (12pm-11am).
Tips: Miscellaneous
- Keep an eye out for glowing lights floating above the map. This can be tapped to get random items.
- Occasionally, after merging items, a hot air balloon will appear. Most balloons will cost 20-100 Gems (depending on rarity), but lower value items may allow you to Watch an Ad to get it for free.
- On rare occasions, you will see a balloon with a timer and an Energy gauge. By spending 90 Energy, you will get to keep the present’s the balloon is carrying. The balloon timer and the presents timer are separate. You can wait until 1 minute is left on the balloon and still get the full 30 minutes from the presents after claiming the balloon.
- You do not need a Facebook account to get the 30 free Gems. When the popup appears, simply tap the button and then close the window that opens.
TapJoy Rewards
Fable Town includes access to the TapJoy Rewards platform. This is an offer wall like what we have on Swagbucks. The offers all award Gems.
I wouldn’t suggest doing any offers that you haven’t already completed on Swagbucks, as these offers will log your Google ID and could potentially prevent you from completing the same offer though #GetPaidTo sites like Swagbucks.
I was able to easily clear several objectives from just doing surveys through TapJoy Rewards. This also makes buying Energy much easier.
The quiz games worked, the visit site and click through offers were hit or miss for me, video watches worked, all auto insurance offers worked the first time but many had different pictures but were all the same company (tons of SPAM in Email and Text/Calls).
The 5-day trial of Background Checker for $1 worked, but make sure you cancel the next day. Also, only do it when the Double points are active. The recurring charges are $50 per month. I used a virtual card but will still cancel. Here is the number (833) 714-0641, you can also do it in the account settings of the website.

Upgrade Timers
Artifacts will merge instantly, while building resources have timers.
Stone
- Tier 3: 30 Seconds
- Tier 4: 40 Seconds
- Tier 5: 1 Min
- Tier 6: 2 Min
- Tier 7: 4 Min
- Tier 8: 15 Min
Slate
- Tier 1-2: Instant
- Tier 3: 40 sec
- Tier 4: 1 min
- Tier 5: 5 min
- Tier 6: 15 min
- Tier 7: 1 hour
- Tier 8: 8 hours
Tent (Canvas)
- Tier 1-2: Instant
- Tier 3: 40 sec
- Tier 4: 1 min
- Tier 5: 5 min
- Tier 6: 15 min (Skip for 12 Gems)
- Tier 7: 1 hour
- Tier 8: 4 hours
- Tier 9: 6 hours (Skip for 107 Gems)
Limestone (11 Tiers)
| Tier | Time | Skip Cost |
|---|---|---|
| 1-2 | Instant | – |
| 3 | 40 sec | 1 Gem |
| 4 | 1 min | 2 Gem |
| 5 | 5 min | 3 Gem |
| 6 | 15 min | 4 Gem |
| 7 | 1 hour | 12 Gem |
| 8 | 4 hours | 20 Gem |
| 9 | 8 hours | 127 Gem |
| 10 | 16 hours | 175 Gem |
| 11 | 1 Day | 200 Gem |
Cryolite (11 Tiers)
Uses the same timing as Limestone.
Fairy Lantern Timers
- Tier 1-2: Instant
- Tier 3: 45 sec
- Tier 4: 1 min 30 sec
| Fairy Lantern 1: 1 Crown |
| Fairy Lantern 2: 3 Crowns |
| Fairy Lantern 3: 10 Crowns |
| Fairy Lantern 4: 35 Crowns |
The game will have you run out of Energy during the Tutorial, so as to introduce the Shop function and the option to purchase Energy. You will get 70 Energy for free as an introduction.
At level 6, your Energy capacity will start to increase. Initially by +5 points.
Gem and Coin Conversion Rates
| Tier 1 | Merge to Use |
| Tier 2 | 1 Gem/Coin |
| Tier 3 | 3 Gem/Coin |
| Tier 4 | 10 Gem/Coin |
| Tier 5 | 30 Gem/Coin |
| Tier 6 | 90 Gem/Coin |
Houses
The fully constructed homes of the Wizards will produce items daily. The Lantern resources can be claimed for Crowns which are points used to upgrade the various home’s.
The upgrades go in order starting with Merlin’s home and then on to Morgana’s home. There are three stages to each upgrade. Having all three upgrades will result in extra daily production of items.
You may tap on any home to see which items may be produced and the current upgraded level. The pillar of Crowns rising from a home is a visual indicator of the current progress on Crown collection for a given home.
Game Progression
A short intro titled Magic Bootcamp, which includes basic game functions, will play out with dialog between Ginny and the Elves.
The satchel from the first Daily Rewards will include an Advanced Wand that can clear the Mermaid Fountain and should bring your level to 4.
The game storyline is not entirely linear. Some objectives can be completed concurrently.
Save Merlin (Chapter 1: Return to Fable Town)
Merlin turned into a statue. You will need a Tier 4 Tome of Magic to unseal Merlin and save him.
These books can be found at the base of the statue.

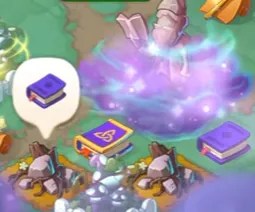
You will need to merge them to get the correct Tier of tome.
The nearby rocks can be mined to gain further tomes for merging.
The large rock takes 20 Energy to clear, the medium rock is 15 Energy.
Once you save Merlin, the tutorial ends and the second map area is opened up.
Rebuild Merlin’s Castle (Day 1)
In the second map area after the Tutorial ends we begin the task of rebuilding Merlin’s House.
| Restore Merlin’s House | 7 Wands |
| Repair the Bridge | 8 Wands |
| Open the area South | Merge Tier 5 Stone |
| Save the Wizard | Merge a Tier 7 Crystal Ball (50 Coins and 10 Gems) |
The first restoration will raise you to level 5 and reveal more of the map. This also reveals the next Wizard trapped in a statue.
After accessing the second map section, you will be offered the Enchanted Treasures area. It adds 14 tiles and a bunch of Chests for $10.99. Check the Shop List for other purchases.
You do get a dollar back on the first purchase, I’m not sure if it is worth it. This offer shows up on most new map areas. It might be good if you find you run out of space quickly.
New items in the area of the map include Rocks and Crystal Balls.
- Orange Rock (Coins): Can be claimed at tier 2 onwards. More coins the higher you merge.
- Crystal Ball (7). Reach Tier 5 to earn 35 Lotto Tokens and 10 Energy.
- Stone (8). Reach Tier 6 to earn 10 Coins and 5 Gems.
You will continue to merge Wands and Stones. The stone becomes a little cottage. The highest Tier Wands can be collected.
The area south of the bridge includes rocks that contain Crystal Balls, Rocks, Stone, and Pumpkin Patch pieces.
Renovate the Library (Day 1)
The library is just up the stairs from Merlin’s House. The Castle is the structure to the left of the house.
For this stage you will need 49 Wands.
| Renovate the Library (1/3) | 9 Wands (25 EXP, and 5 Gems) |
| Restore the Tower 2/3 | 15 Wands (10 Energy, 10 Coins, and 1 Gem) |
| Restore Merlin’s Castle 3/3 | Merge Tier 8 Stone (25 EXP, and 5 Gems) |
| Heal the Oak | 10 Wands (25 EXP and 1 Gem) |
| Tidy up the Area | 15 Wands (25 EXP and 1 Gem) |
Fairy Island is the first limited time island map you can access. The Ginger Cat creature is available after playing on the fairy map for the first time.
The side islands are a good option if you run out of Energy on the main island or if you want to gain extra chests or Creatures.
The only objective you need to clear on these optional islands is the main creature shown by tapping on a nearby pedestal.
The Shop on each island is independent of the others. You can watch ads for energy on multiple islands if concurrent events are active.
Restore the Habitat (Chapter 2: Crystal of Secrets)
The Habitat is the area to the east where you will see a picture of the Polar Owl. I unlocked this at level 10.
After completing the Castle, any remaining Stones will automatically convert to Fairy Lanterns of the same Tier.
Magic Orbs are converted to Scissors. Resources in the Mine will switch to the new items.
For this stage you will need 15 Wands.
| Reveal the Habitat | Collect Polar Owl |
| Restore the Habitat | 15 Wands |
This last objective should begin Chapter 2: Crystal of Secrets. The reward includes 50 Coins and Energy and a Wizard Card Chest (Energy and a random card).
For this stage you will need 105 Wands.
| Build the Extension 1/3 | Requires: 15 Wands Rewards: 50 EXP and 1 Gem |
| Unlock more of the Habitat | Requires: Tier 3 Slate, Level 11 |
| Save the Wizard | Requires: Tier 8 Scissors Rewards: 15 Coins and 3 Gems |
| Install the Fountain 2/3 | Requires: 15 Wands Rewards: 50 EXP and 1 Gem |
| Build the Terrace | Requires: 15 Wands Rewards: 50 EXP and 1 Gem |
| Unlock more of the Habitat | Requires: Tier 4 Slate, Level 12 |
| Repair the Dock | Requires: 15 Wands Rewards: 50 EXP and 1 Gem |
| Finish the Meditation Center 3/3 | Requires: Tier 9 Slate Rewards: 50 EXP and 1 Gem |
| Fix the Decor Area | Requires: Free Rewards: 1 Gem |
| Restore the Habitat | Requires: 15 Wands Rewards: 50 EXP and 1 Gem |
| Clear Debris | Requires: 15 Wands Rewards: 50 EXP and 1 Gem |
| Build the Cottage | Requires: 15 Wands Rewards: 50 EXP and 1 Gem |
New Resources: Fairy Lanterns, Scissors, and Slate.
The Slate has 9 Tiers and is used to construct Morgana’s House. Completing the Extension brought me to level 11, a requirement to unlock more of the Habitat.
The Fountain and Meditation Center are both part of Morgana’s home area.
Clean the Garden Library (Day 2)
The Garden is in Morgana’s area of the map. If it is taking you a while to clear her objectives, you may advance to this stage early.
We start to see a jump in the Wand cost to clear missions starting with the Garden cleanup.
For this stage you will need 110 Wands.
| Clean the Garden | Requires: 15 Wands Rewards: 50 EXP and 1 Gem |
| Beautify the Pond | Requires: 25 Wands Rewards: 50 EXP and 1 Gem |
| Return the Magic Lotus | Requires: 15 Wands Rewards: 50 EXP and 1 Gem |
| Restore the Habitat | Requires: 25 Wands Rewards: 50 EXP and 1 Gem |
| Clear the Debris | Requires: 15 Wands Rewards: 50 EXP and 1 Gem |
| Heal the Tree | Requires: 15 Wands Rewards: 50 EXP and 1 Gem |
The Resources in Una’s area may produce Guardian Stones on occasion.
Guardian Stones are broken down by your unlocked Creatures. Each one can be once per day, unless you spend Gems to wake them up.
Guardian Chests contain blue flames that can be merged to form Guardian Animals: Owl, Cat, Fox, Wolf, Boar, etc. There are 17 different animal forms. This will take up a large portion of your map.
The Pondside Cottage and Tea Treehouse within Morgana’s area will produce small Guardian Chests daily.
Build the Altar (Day 3-4)
The altar is a spot to place a Decoration item like the Stone Dias or the Peacat decoration. The steps lead up to an old tree which gets renovated into a tea party space.
Clearing these objectives should bring you to level 20 and open the next area with the third Wizard, Prince.
For this stage you will need 130 Wands.
| Build the Altar | Requires: 25 Wands Rewards: 50 EXP and 1 Gem |
| Build the Steps | Requires: 25 Wands Rewards: 50 EXP and 1 Gem |
| Build the Terrace | Requires: 15 Wands Rewards: 50 EXP and 1 Gem |
| Set Up a Tea Party | Requires: 25 Wands Rewards: 50 EXP and 1 Gem |
| Fix the Decor Area | Requires: 15 Wands Rewards: 50 EXP and 1 Gem |
| Fix the Stairs | Requires: 25 Wands Rewards: 50 EXP and 1 Gem |
Around this time, I finished the Fairy Island with 1 hour and 23 minutes left on the clock. I cleared the entire map of objectives, but there was no additional reward for the other items. So, only the Peacat will provide a reward.
Chapter 3: Tailor with a Twist
Rescue Una (Day 5)
I reached this area on the 5th day of play. But by the 8th day I had not rescued the wizard.
Una is the 5th wizard (area at the top of them map). She is a guitar player and her item you need to save her is a guitar. She is physically located in Princes’ area of the map, but her area comes after you finish the Sewing Workshop.
The guitars can begin spawning during the previous section if you have cleared Morgana’s home. New items in this area include Tents (Canvas).
During chapter 3, I failed the Mammoth island event by not focusing on the primary objective. Immediately afterward, two new event islands opened up: Chasing Jackalopes and Fauxhall Station. I aced both of these, but then failed the Wizard of Oz island that came next.
I have been spending Coins and Gems to clear the optional island maps. I have found the time spent on the other maps helps to pass the time on the main map and it gives me some extra chests to use.
For this stage you will need 430 Wands, plus the Tier 9 Canvas and Guitar.
| Save the Wizard (Una) | Requires: Tier 9 Guitar Rewards: 25 Coins and 5 Gems |
| Clear the Bushes | Requires: 25 Wands Rewards: 50 EXP and 3 Gems |
| Fix the Stairs | Requires: 35 Wands Rewards: 50 EXP and 3 Gems |
| Build the Stables | Requires: 45 Wands Rewards: 50 EXP and 3 Gems |
| Set a Sewing Machine | Requires: 55 Wands Rewards: 50 EXP and 3 Gems |
| Restore the Workshop | Requires: Tier 9 Tent Rewards: 50 EXP and 3 Gems |
| Repair the Swing | Requires: 25 Wands Rewards: 50 EXP and 3 Gems |
| Restore the Gazebo | Requires: 35 Wands Rewards: 50 EXP and 3 Gems |
| Decorate the Gazebo | Requires: 45 Wands Rewards: 50 EXP and 3 Gems |
| Restore the Habitat | Requires: 25 Wands Rewards: 50 EXP and 3 Gems |
| Restore the Habitat | Requires: 35 Wands Rewards: 50 EXP and 3 Gems |
| Clear the Debris | Requires: 25 Wands Rewards: 50 EXP and 3 Gems |
| Build the Workshop (Day 7) | Requires: 35 Wands Rewards: 50 EXP and 3 Gems |
| Tidy Up the Area | Requires: 45 Wands Rewards: 50 EXP and 3 Gems |
Install Water Wheel (Day 8)
For this stage you will need 365 Wands.
| Install the Water Wheel | Requires: 45 Wands Rewards: 50 EXP and 3 Gems |
| Start Production (Day 9) | Requires: 55 Wands Rewards: 50 EXP and 3 Gems |
| Clear the Area | Requires: 25 Wands Rewards: 50 EXP and 3 Gems |
| Build the Atelier | Requires: 35 Wands Rewards: 50 EXP and 3 Gems |
| Set Up the Podium | Requires: 45 Wands Rewards: 50 EXP and 3 Gems |
| Renovate the Stage | Requires: 35 Wands Rewards: 50 EXP and 3 Gems |
| Install the Canopy | Requires: 55 Wands Rewards: 50 EXP and 3 Gems |
| Host the Fashion Show | Requires: 35 Wands Rewards: 50 EXP and 3 Gems |
| Fix the Stairs* | Requires: 35 Wands Rewards: 50 EXP and 3 Gems |
*Fix the Stairs, is the final task for Una’s area of the map.
You should be close to restoring the workshop by this point if you haven’t done so already.
That will bring you to level 30 and open up the next section of map, Una’s area. The Ice Queen’s Palace must be in the level 40 area after Una.
Chapter 4: Diva in Distress
New resources for this are include Limestone (Building) and Ice Cream (Artifact). Both go to Tier 10. I had ice cream start spawning before I hit level 30.
I saved up 125 Wands before I finally finished the Sewing Workshop and moved into Una’s area of the map.
Enchant the Tree (Day 12)
The tree is the third part of Una’s house and will trigger the goal “Enchant the Tree.”
Total: 280 Wands to clear this section.
| Save the Wizard (#6) | Requires: Tier 10 Ice Cream Reward: 25 Coins and 5 Gems |
| Clear the Area | Requires: 25 Wands Rewards: 50 EXP and 3 Gems |
| Build the Guest House | Requires: 35 Wands Rewards: 50 EXP and 3 Gems |
| Install the Gazebo | Requires: 45 Wands Rewards: 50 EXP and 3 Gems |
| Enchant the Tree | Requires: 55 Wands Rewards: 50 EXP and 3 Gems |
| Build the Fence | Requires: 75 Wands Rewards: 100 EXP and 3 Gems |
| Finish Castle Rock | Requires: Tier 10 Limestone Rewards: 50 EXP and 3 Gems |
| Clear the Trash (not the finish) | Requires: 35 Wands Rewards: 50 EXP and 3 Gems |
Rebuild Water Sculpture (Day 17)
The Water Sculpture has four parts: Place the Sculpture, Starts the Light, Arrange the Lanterns, and Plant the Flowers.
Total: 905 Wands to Clear this section.
| Place the Sculpture | Requires: 45 Wands Rewards: 50 EXP and 3 Gems |
| Start the Light | Requires: 55 Wands Rewards: 50 EXP and 3 Gems |
| Arrange the Lanterns | Requires: 55 Wands Rewards: 50 EXP and 3 Gems |
| Plant the Flowers | Requires: 85 Wands Rewards: 100 EXP and 3 Gems |
| Restore the Habitat | Requires: 35 Wands Rewards: 50 EXP and 3 Gems |
| Restore the Habitat | Requires: 45 Wands Rewards: 50 EXP and 3 Gems |
| Clear the Bushes | Requires: 35 Wands Rewards: 50 EXP and 3 Gems |
| Repair the Stage | Requires: 45 Wands Rewards: 50 EXP and 3 Gems |
| Install the Canopy (Day 18) | Requires: 55 Wands Rewards: 50 EXP and 3 Gems |
| Install the Speakers | Requires: 55 Wands Rewards: 50 EXP and 3 Gems |
| Decorate the Stage (Day 19) | Requires: 85 Wands Rewards: 100 EXP and 3 Gems |
| Restore the Habitat | Requires: 35 Wands Rewards: 50 EXP and 3 Gems |
| Restore the Habitat | Requires: 45 Wands Rewards: 50 EXP and 3 Gems |
| Remove the Old Organ (Day 20) | Requires: 35 Wands Rewards: 50 EXP and 3 Gems |
| Install the Keys | Requires: 45 Wands Rewards: 50 EXP and 3 Gems |
| Add the Small Pipes | Requires: 55 Wands Rewards: 50 EXP and 3 Gems |
| Add the Main Pipes | Requires: 55 Wands Rewards: 50 EXP and 3 Gems |
| Open the Organ (Day 22) | Requires: 85 Wands Rewards: 100 EXP and 3 Gems |
| Clear the Debris | Requires: 35 Wands Rewards: 50 EXP and 3 Gems |
Install the Drum (Day 30)
At the end of Una’s Area, 240 Wands needed.
| Install the Drum | Requires: 45 Wands Rewards: 50 EXP and 3 Gems |
| Paint the Drum | Requires: 55 Wands Rewards: 50 EXP and 3 Gems |
| Expand the Drum | Requires: 65 Wands Rewards: 50 EXP and 3 Gems |
| Decorate the Drum | Requires: 75 Wands Rewards: 50 EXP and 3 Gems |
You need to finish the Limestone and Ice Cream to reach level 40 and open up the Ice Queen area.
Hero Chests will provide Artifacts (Ice Cream). If you have more than 100 Wands or 90 Gems, a pop-up offer will offer the Hero chest and 50 Energy in exchange for the Wands or Gems.

Similar offers for Wand Tree and Construction Rocks may show. These cannot be recalled once dismissed, so be careful.
Chapter 5: Sweet Magic (level 40)
Finishing the drum is the last objective before chapter 5 opens up.
You will notice after finishing the Ice Cream, chests will start spawning Cauldrons for the next trapped wizard. The mine will stop generating seeds and only provide Cauldrons and obsolete Limestone, until you begin the Cryolite construction stage.
Artifacts turn into Lanterns and Construction Materials become Coins.
Clear the Trash
| Save the Wizard | Requires: Tier 11 Cauldron Rewards: 25 Coins and 5 Gems |
| Clear the Ruins | Requires: 25 Wands Rewards: 50 EXP and 3 Gems |
| Place the Worker Huts | Requires: 35 Wands Rewards: 50 EXP and 3 Gems |
| Cool Down the Factory | Requires: 45 Wands Rewards: 50 EXP and 3 Gems |
| Add the Caramel Shop | Requires: 55 Wands Rewards: 50 EXP and 3 Gems |
| Place the Candy Shop | Requires: 75 Wands Rewards: 50 EXP and 3 Gems |
| Repair the Foundation | Requires: 25 Wands Rewards: 50 EXP and 3 Gems |
| Prepare the Materials | Requires: 35 Wands Rewards: 50 EXP and 3 Gems |
| Place the Sled | Requires: 45 Wands Rewards: 50 EXP and 3 Gems |
| Install the Cover | Requires: 75 Wands Rewards: 50 EXP and 3 Gems |
| Clear the Trash (You Win!) | Requires: 25 Wands Rewards: 50 EXP and 3 Gems |
| Total Wands Used | 440w |
After reaching chapter 5, you only need to collect 440 wands to reach the last goal. It is not necessary to merge the artifacts or the construction materials. Only collect wands. So, focus on using the Green House and buying up all of the Foods in the Shop.
Total Wands: 3,020 for the entire game offer.
Other Functions
Side Islands & Order Rush (3-Day Event)
The optional islands are one of the ways to receive Bronze Trophies. Its not necessary to clear the entire island to get the Trophy, it is available at stage 24 of the event.
However, if you clear all 32 stages, you get a Tier 3 Treasure Chest (Tier 3: Coins and Gems)
You will also get them from the Order Rush event, but the majority come from these islands. The Rush events occur on your main island and include 5 potential Trophies.
Bronze Rush Trophies generate 1 Coin, Silver generate 3 Coins, and Gold generate 5 Coins.
| Event | Benefit |
|---|---|
| Merge Rush | Coin |
| Order Rush | Coin |
| Building Rush | Coin |
| Energy Rush | Energy |
| Timeless Fest | Energy |
| Gemstone Glow | |
| Lucky Coins |
If you want to conserve space on the your main board, then don’t clear the entire side island. You will forfeit the Bronze Trophy reward, but it will save up to 14 tiles.
Trophies use the same merging mechanic to upgrade to Silver and Gold which provide greater rewards. If you collect them and save the full 5 to merge, then your looking at potentially 50-70 tiles covered at any given time.
I believe the islands are on a set loop starting with the Peacat and ending with the Polar Bear. On the second loop, new locations are added.
Bronze Animal Trophies generate 1 Creature Card, Silver generate 3 Cards, and Gold generate 5 Cards.
| Location | Trophy |
|---|---|
| Enchanted Sands | Peacat |
| Dragon Woods | |
| Underwater Realm | |
| Fauxhall Station | Platypus |
| Winter Forest | Winter Fox |
| Guiding Star | |
| Night Watch | Lion |
| Winged Couriers | Owl |
| The Immortality Secret | |
| Chasing Jackalopes | Jackalop |
| Desert Riddles | |
| Winds of Fate | |
| Ever-Blooming Garden | |
| Ice Age | |
| Song of the Sea | |
| Cave of Cerberus | |
| Enchanted Forest | Hagrid |
| Beach Day Magic | |
| Secret Ingredient | |
| Capybara Retreat | Capybara |
| Elves in Wonderland | Elf |
| Unicorn Dreamland | Unicorn |
| Back to Magic School | Wizard |
| Tideborn Treasures | Cactapus |
| Midnight Carnival | |
| Witch of the Valley | Witch |
Tokens (Wizards, Creature, and Decoration)
The Wizard Card Case includes a single wizard card and 60 Energy. Wizards can be used on event island to remove special objects which in turn generate small energy orbs.
The more Wizard you have of a particular color, the faster you can clear the object. Wizards can be used once every 24 hours across all maps.
Wizards
Creatures
Green glowing stuff in bucket (don’t know name) can be Crushed by your creatures. Doing so places the creature on 15 hour cooldown timer. You can spend 50 Gems to wake them up sooner.
Clearing the glowy stuff produces a Guardian Chest which provides those florescent blue Animal tokens that are used to unlock sections of the Habitat.

Raising the level of a creature provides a set reward at each stage, with the final prize being a Wand Tree. The number of Creature cards needed to level up depends on the Tier of the creature and how many levels have already been achieved.
The following numbers have not been verified:
- Dragon: 3 Paws, Progress 3/10, Cost 5 Cards.
- Stellar Bear: 3 Paws, Progress 1/10, Cost 5 Cards.
- Gryphon: 2 Paws, Progress 6/10, Cost 15 Cards.
- Unicorn: 2 Paws, Progress 7/10, Cost 15 Cards.
- Wolfion: 2 Paws, Progress 1/10, Cost 10 Cards.
- Snow Llama: 2 Paws, Progress 1/10, Cost 10 Cards.
- Sabertooth: 2 Paws, Progress 3/10, Cost 10 Cards.
- Mammoth: 2 Paws, Progress 5/10, Cost 10 Cards.
- Polar Owl: 1 Paw, Progress 7/10, Cost 25 Cards.
- Ginger Cat: 1 Paw, Progress 9/10, Cost 25 Cards.
- Jackalope: 1 Paw, Progress 7/10, Cost 25 Cards.
- Capypig: 1 Paw, Progress 3/10, Cost 15 Cards.
- Fluffypuff: 1 Paw, Progress 6/10, Cost 25 Cards.
If you use Universal Creature Cards, the cost increases compared with directly receiving cards from the Island completions.
- 1 Paw Creature: 25 Cards = 125 Universal Cards, or 300 Gems.
- 2 Paw Creature: 15 Cards = 150 Universal Cards, or 380 Gems.
- 3 Paw Creature: 5 Cards = 200 Universal Cards, or 575 Gems.
Decorations
This are just aesthetic and don’t provide any benefits.

Item List
Game Item List
Artifacts
- Spellbooks (Merlin)
- Crystal Balls (Morgana)
- Tailor’s Scissors (Prince Charming)
- Musical Instruments (Una)
- Ice Cream (Ice Queen)
- Cauldrons (Wizard 6?)
- Lucky Horseshoes
- Stone Snakes
- Free Weights
- Magic Artifacts
- Hammers
Buildings
- Stone (Merlin’s House)
- Slate (Morgana’s House)
- Canvas (Prince Charming’s House)
- Limestone (Una’s House)
- Cryolite (Ice Queen’s House)
- Peatstone
- Cloverwood Objects
- Marble
- Granite
- Blocks
Resources
- Guardian Stone
- Slate
- Canvas
- Limestone
- Cryolite
- Peatstone
- Cloverwood
- Marble
- Granite
- Blocks
Miscellaneous
- Orange Rocks > Coins
- Crystal Ball
- Wands
- Magic Tomes
- Coins
- Magic Chests
- Treasure Chest (3 Tiers) > Gems and Coins
- Fancy Chest
- Nautical Chest
- Gems
- Common Fauna Ball > Creature Tokens
- Fairy Lantern
- Energy Orb
- Slate (Purple Stone in a Bucket/Wheelbarrow)
- Fairy Chest
- Mystic Chest
- Shatter Stones > Remove Obstacles
- Animal Guardians > Animal Tokens
Produce
- Pumpkin Patch > Pumpkins
- Pumpkins
- Mushroom Patch > Mushrooms
- Mushrooms
- Pears
- Burst Berries
Fable Town Shop List
The wizard flying overhead makes it difficult to see each chest type. I guessed on some.
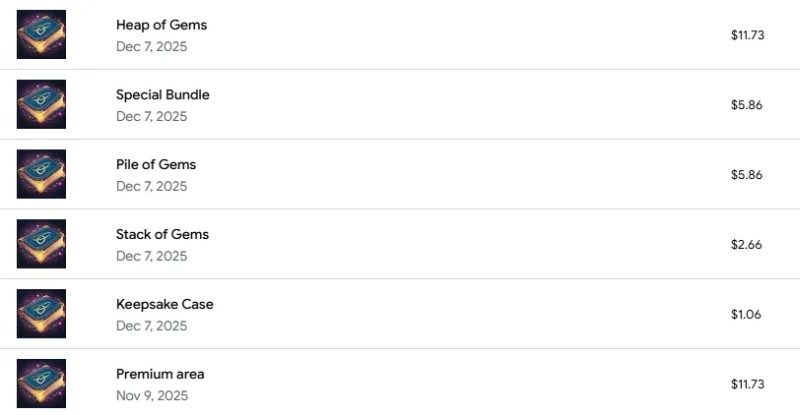
Gem Packs
When buying a $5 or higher pack, the game will offer a bonus if you use their market payment portal instead of Google. You cannot use Google Play credit in the Market.
- Stack of Gems $2.49 (300 Gems)
- Pile of Gems $5.49 (800 Gems)
- Heap of gems $10.99 (1,200 Gems)
Special Offers
- Begin Well-equipped: $2.99 (200 Gems, 700 Coins, and 300 Energy)
- Enchanted Treasures: $10.99 (14 Tiles and Chests)
- Lost Treasures 500 Gems (12 Tiles)
- Ancient Treasures: $5.49 (13 Tiles and Chests)
- Fairy Treasures $22.99 (16 Tiles)
- Keepsake Chest $0.99 (2 Hero Chests)
- Special Bundle $5.49 (250 Energy, 3x Construction Chests T3, and 3x Seed Bags T3)
Currency
| Large Coin Chest | 999 Gems | 5,500 Coins |
| Medium Coin Purse | 499 Gems | 2,500 Coins |
| Small Coin Purse | 199 Gems | 900 Coins |
| Pile of Coins | 35 Gems | 150 Coins |
| Few Coins | Free |
Energy Tab
| Name | Cost | Daily Limit | Contents |
|---|---|---|
| Watch An Ad | Free (Limit 1) | 25 Energy |
| Energy | 350 Coins (Limit 3) | 90 Energy |
| Energy | 100 Gems | 100 Energy |
| Medium Chest | $0.99 (One Time Offer) | 200 Energy |
| Large Chest | 990 Coins (Limit 1) | 300 Energy |
Produce
| Name | Cost | Daily Limit | Contents |
|---|---|---|
| Seed Bag (1) | Free (Every 6 Hours) | 1x item |
| Seed Bag (2) | 150 Coins (Limit 3) | 1x item |
| Seed Bag (3) | 90 Gems (No Limit) Cost Increases | 1x item |
| Seed Bag (3) | $0.99 (One Time Offer) | 2x items |
| Pumpkin | 75 Coins (Limit 6) | 5x Pumpkins |
Buildings
| Name | Cost | Daily Limit | Contents |
|---|---|---|
| Pile of Coins | 35 Gems (Limit 2) | 150 Coins |
| Purse of Coins | 199 Gems | 1k Coins |
| Large Purse of Coins | 499 Gems | 2.5k Coins |
| Chest of Coins | 999 Gems | 5k Coins |
| Few Coins | Free (Every 6 Hours) | 10 Coins |
Special
The items listed here are specific to the section of map you are on. In area 2, it is crystal balls.
| Name | Cost | Daily Limit | Contents |
|---|---|---|
| Crystal Ball (1) | 55 Coins (5 times) | 5x items |
| Crystal Ball (2) | 25 Gems (5 times) | 5x items |
| Feathered Chest | 90 Gems (once) | 1x Chest |
| Feathered Chest | $0.99 (One Time Offer) | 2x Chests |
| Small Chest | Free (Every 6 Hours) | 1x Chest |
Pop-Up Sales
| Name | Price (USD) | Contents |
|---|---|---|
| Order Rush Time | 10.99 | 6x Tier 3 Seed Sacks and 650 Gems |
| Fast Track Your Progress | 100 Wands | 50 Energy and T3 Construction Chest |
