

Hi Hero,
A new fantasy adventure is here! Crystal Saga Nova is officially live on Google Play! Whether you are a longtime MMORPG fan or looking for a new fantasy adventure, your journey starts here.
Crystal Saga Nova is LIVE. Enter the world, claim your rewards, and forge your legend!
About
Crystal Saga Nova (CSN) is a true MMORPG set in the world of Vidalia. The game supports group play in Dungeons and the World Map, with up to 6 party members and a companion pet. The game includes 5 classes, each with 2 paths available depending on play style, allowing for character customization.
Character equipment drops are typically Class-Neutral and Unbound, allowing for trade and commerce between players on a server.
Previous titles in this franchise were browser-based PC games. CSN is the first title in the franchise to be playable natively on a mobile device.
What Awaits You:
- Epic PvE & Real-Time PvP — Challenge bosses and battle other players.
- Monster Invasion — Defeat monsters and claim grand rewards.
- Lucky Wheel & Lucky Card — Try your luck and win rare rewards.
- 7-Day Login Rewards — Log in daily and collect valuable gifts.
- Legendary Pets, Mounts, Wings & Fashion — Build your character your way.
- Guilds & Social Gameplay — Team up and fight for glory.

Game Codes
Game codes are available via a DM to GMTerra on Discord. New Codes are released each month, and older codes expire.
To use a game code in-game, look to the top of the screen; there will be a Perks button. Tap Perks to access a panel. On the left side, at the bottom of the list is the “Game Code” entry button. You may enter any number of codes.
- CSNGOOD
- CSN2026UP
- CSN888
- CSN999
- CSN111
- CSNNEW
- CSNPCGO
- csnghgforum
- csn0518
- csnplaynow
- csnsuper
- B2SAGA
- NOVAGO
Launch Code: CSN2026UP

Social Links
- Facebook: https://www.facebook.com/crystalsaganova
- Discord: https://discord.gg/PCyfsXtYD7
- YouTube: https://www.youtube.com/@crystalsaganova
- CrystalNova.gg: https://crystalsaganova.com/guides/
Specifications
- Developer: R2Games / Proficient City Hong Kong
- Category: Adventure / RPG
- File Size: 1 GB
- Released on: September 19, 2026
Download Link:
- Android: https://play.google.com/store/apps/details?id=com.pchk.csn&hl=en_US
- PC: https://www.r2games.com/link.php?id=1012212
Social Events and Media

Table of Contents
Character Creation
In Crystal Saga Nova, you can choose from 5 classes, a gender, and name your character. Each class has two paths that can be followed, each with its own strengths and weaknesses. Players may customize their characters.

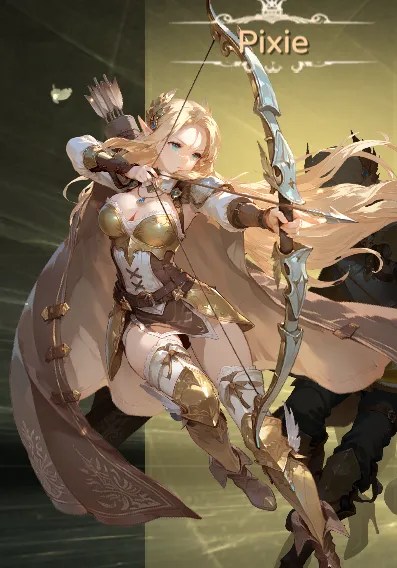


- Pixie: CC/Range DPS. Claims lives from afar; their unmatched range allows them to look down on all foes.
- Mage: AOE/Mag DMG. A deadly symphony of ice and fire that can annihilate entire armies in an instant.
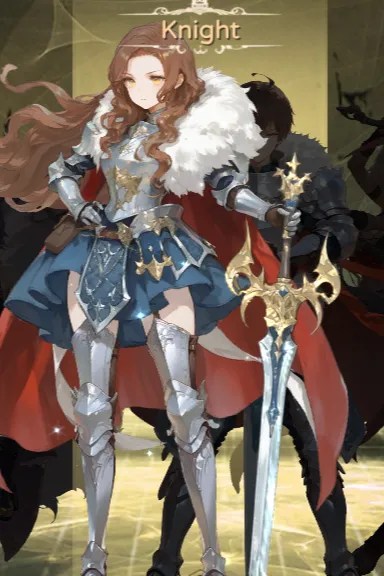
- Knight: Tank/Phys DPS. Protects allies with a sturdy body and leads every charge without hesitation.
- Rogue: Assassin/Control. Moves like wind and shadows, plunging enemies into peril with surprise attacks.
- Priest: Healer/Support. Channels divine power to buff allies and heal the wounded, ensuring the party’s survival.
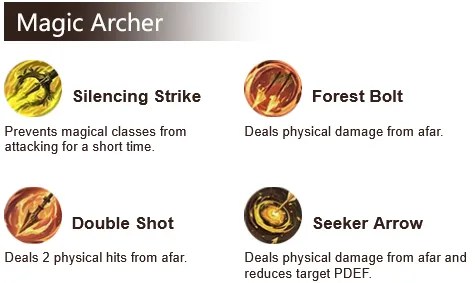
Magic Archer: Ranged DPS, can silence magical enemies, serious single-target physical damage.

Spirit Archer: Debuffs targets with Crowd Control effects. Self-healing, has knock-back and Damage-Over-Time abilities.

Blast Mage: Great for solo play. Heavy single-target damage. Has some Area-of-Effect spells, but not as many as Frost Mage.

Frost Mage: Area-of-Effect spells hit multiple targets and debuff them with the Slow effect. Binds enemies. Has defensive spells. Good for group play.

Iron Knight: Physical DPS; this unit focuses on serious single-target damage.
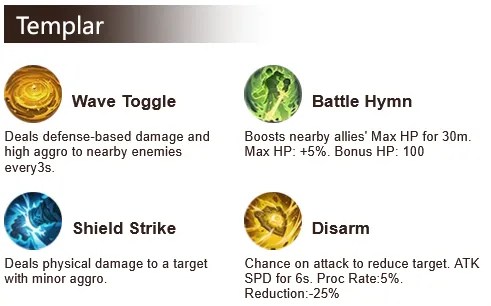
Templar: A tank, aggros enemies, and deals damage based on defense stat. Buffs allies and reduces enemy attack value.
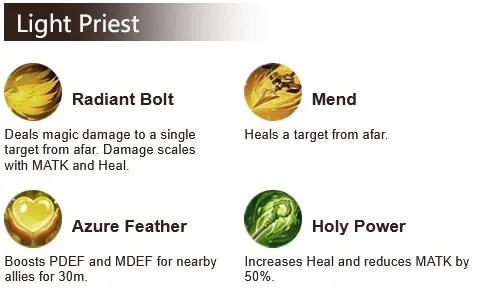
Light Priest: Healer and Buffer, great for group play in parties and dungeons. Heal-Over-Time effects, clears debuffs from nearby allies, and group healing.

Blood Priest: Has a large Health pool and attacks based on HP value; higher HP = More DMG. Debuffs and Crowd-Controls enemies and deals Damage-Over-Time, and has Lifesteal abilities for self-healing.
Priest Build Guide for Light or Blood

Gale Rogue: Debuffs enemies and attacks multiple targets. Has Damage-Over-Time effects.
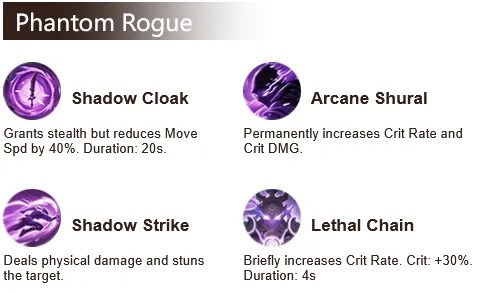
Phantom Rogue: Focuses on Stealth and Crowd Control abilities and can stun enemies; has a high crit rating on attacks.
Main Game Screen
On the main game screen, you may navigate the world by tapping anywhere on the screen.
You may access Settings by tapping the Cog icon below the mini-map, to the top-right.
Tapping on your avatar icon will open the Character Panel.

- Mini-Map and Settings: Here you can tap to view the larger World map or tap on the Cog icon to access settings and adjust video and audio effects.
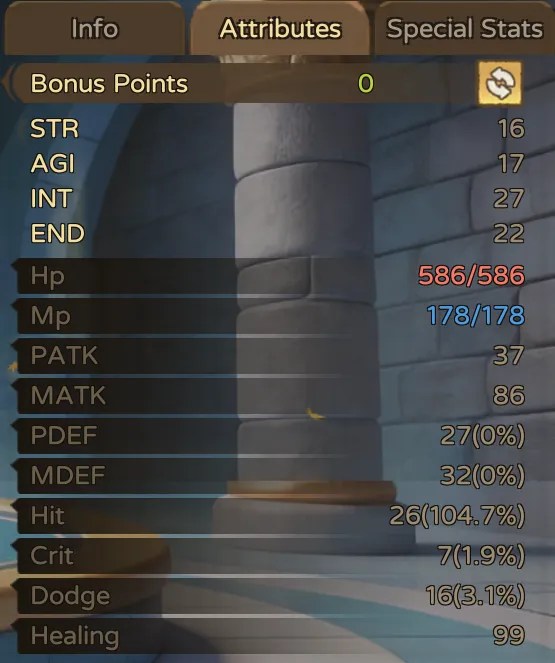
- Character Panel: Tap here to view your character sheet, including info, attributes, and special stats.
- You may also select a Title (buff) and modify your current mount. Below the player display is your currently active Pet.
- HP (Red Bar) and MP (Blue Bar) are shown.
- Quest List: Any currently active quests will be displayed here.
- Chat Box: Displays World Chat and System messages such as item pickups. Above the chat box are received party invites and/or friend requests.
- Active Skills: Your primary attack and slotted skills are displayed here. In the example, two Priest skills: Radiant Blast and Mend are displayed.
- Quick Slots and Player Menu: Your Inventory, Skills, Daily Activities, and Quick Slot Items are accessed in this menu.
- The 4 Leaf Clover icon can be tapped to toggle the extended menu, which includes Pets and Mount.
- Player: Your character always remains in the center of view as they move about the game world.
- Pet: Your pet follows behind your character and will aid you in combat.
- The starter Pet can be either a Bear Cub or an Archer.
- Your Pet will gain experience in combat and can be leveled up.
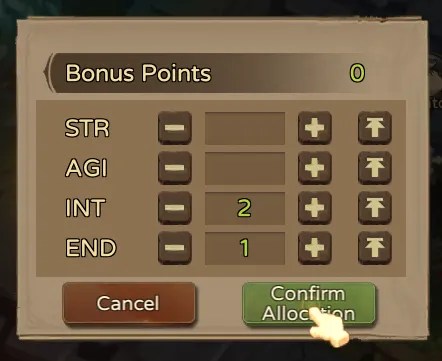
- You may choose how stat points are allocated.
- Monster: Enemies on the game map can be double-tapped to initiate combat; alternatively, you may tap on a monster and then tap a skill to start combat.
- Heals and Buffs work the same way: tap on a target and select the skill you want to use.
- In the Settings panel, you may set certain abilities and items to Automatic Use.
- Name and Title: Your currently selected Title and your player name are displayed above the character on the game map.
- Game Menu: The Events panel and Premium (P2P) content screens may be accessed via this menu.
- Monthly Pass, Perks, Privileges, and Shop.
- Game Codes may be redeemed in the Perks panel.
Towns

Looking at the World Map, you will see 8 regions that can be traveled to.
Each region includes a non-combat zone that functions as a town with NPC merchants players may interact with.
Angeltear Island: Tyria Village
The tutorial island is where everyone starts.
This section of the game is almost entirely automatic; however, you can tap anywhere on the screen to stop auto-movement, and you can hold off on accepting new quests until you have familiarized yourself with your progress.

Twilight Land: Starglade
This town is home to the King and most Vendors you will find in-game. You may sell unwanted items at any vendor or open your inventory and select the Stall option to sell items to other players. This can be done both actively and in Offline mode.
In the central area of town is a statue of an angel. This is the Wishing Goddess. Starting at level 40, you may choose a Faith, which will provide a large boost to your stats. The Goddess also allows you to exchange Lucky Coins for Wishes.
Lucky Coins are created by combining 15 Silver (Currency) with an Ancient Coin. You may use them 5 times each day, with additional wishes available at high VIP ranks.
Ancient Coins drop from Lvl 30+ Elites.
Wish Fragments may be spent in the Wish Shop to purchase permanent Titles.
Other Villages on The World Map
Crimson Mist Valley: Bloodfang Village
Southern Wetlands: Tree of Life
Infinite Peak: Aurora Point
Floating Island: Void Encampment
Ghost City: Bloodshed Hallow
Sky City: Seira Island
Character Panel
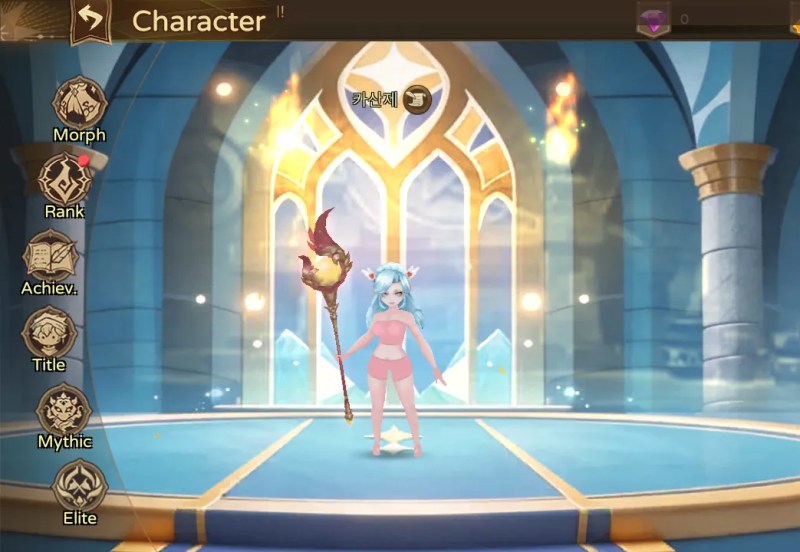
On this screen, you can view your character’s appearance, including any gear equipped.
Three statistical tabs are to the right: Info, Attributes, and Special Stats.
On the left side are several sub-menus: Morph, Rank, Achievements, Title, Mythic, and Elite.


Morph
Change the appearance of your currently equipped Mount by applying a new Skin.
- Obtain a skin to unlock its appearance.
- Preview: Click any skin to see how it looks on your character.
- Select an unlocked skin to Morph. This changes your visual image only and does not affect combat stats.
- You have three preset slots. Mix and match Mounts, Wings, Outfits, and Fragarachs to switch styles instantly.
Rank
Reaching a new rank will earn Vouchers.
- Rank Advancement: Complete guild quests and participate in battlegrounds to earn reputation. Once your reputation meets the requirements, your rank will automatically increase.
- Salary Benefits: The higher your rank, the more vouchers you will receive each time you claim your salary.
- Medal Equipment: Advancing your rank unlocks the ability to equip higher-level medals. Equipping medals grants additional attribute bonuses.


Achievements

The achievements panel includes all possible Titles that can be achieved and displays the requirements to unlock those titles.
After unlocking a Title, you may activate it in the Title menu.
Title

You may select a Title to gain the listed buff.
The starter title (Novice) provides +25 HP.
Mythic

You may select a Mythic Title to gain all of the listed buffs for your character.
The special achievement will also display on your character for other players to see.
Elite

Character must reach Rebirth 2 at level 80 before this option becomes available.
Leveling Up
Each level gained provides the player with 3 attribute points to distribute freely. By default, the game will allocate attribute points into recommended stats; however, the player may alter the selected stats as they wish.
Level 80 is the current level cap. I started seeing Main Story quests with level requirements around level 42.
I left my game running in AFK mode for around 8 hours to get 1 level from killing mobs.
Completing Daily Dungeons and using an EXP boost can speed things up. The green bar along the bottom of the screen represents your EXP progression. Pet levels also appear limited, possibly by player level.
Mount
You may access the Mounts panel by either tapping on the corresponding button from the Main Screen sub-menu.
Your starter Mount is a Warwolf. The upgrade path for your Mount is in the Morph section of your Character Panel. The next stage is Black Panther (incorrectly listed as “forged from Battle Bear” in the tooltip.
Starter Mount
Rabid Raccoon and Baby Turtle are both rewards for Main Story quests; however, you can acquire them early from vendors.
| Mount | Combine With |
|---|---|
| Warwolf | Mount Token |
| Black Panther | Rabid Raccoon + Mount Token |
| Mystic Scorpion | Warhorse (or Baby Turtle) + Mount Token |
| Battle Bear | Divine Token |
| Gorilla Titan | Divine Token |
| Bald Eagle | Divine Token |
| Hellwing Emperor | Final Form |
See the full mount guide below.
Pets
At level 10, you will be instructed to tame your first Pet. Your starter pet can be either a Bear or an Archer. The quest will have you purchase a level 10 scroll from the General vendor, but you may also buy more scrolls from the Island Vendor.
Once you have transported to Beast Island F1, you can tap either one of the nearby bears, or walk north to the area with Archers and tap on one of those.
The first taming is an instant success. Below the monster name, you will see a hand icon labeled Tame. Just tap this button to attempt to capture the Pet.
If you decide to capture multiple pets, keep in mind that it is easier to tame a wounded monster. If your Tame attempt fails, try hitting the monster once or twice and then tap on Tame again.
Upgrading your Pet will turn it into a Mutant form with improved stats. This will reduce the level of the Pet by 10 levels. Mutant pets have more skills.
See the full pet guide below.
Wings
Your Wings are a form of equipment with their own upgrade panel. Collecting Wings can unlock certain Achievements.
- Upgrade Wings using Phantom Feathers, which Bosses can drop, or you can buy them from the Shop.
- You get 1 Feather from the Daily Login.
- At level 40, the Vidalia Daily Dungeon earns 1 Feather after 3 attempts.
- Level Rewards 30 (Perks): Grants 20 Feathers.
- Online Bonus 60 min (Perks): Grants 10 Feathers.
- Login Rewards Day 15 and 28: Grants 1 Feather.
- VIP Packs: Include Feathers at each new Tier, limited to one purchase.
- Limited Pack: Wing Pack includes x75 Ethereal Wings (Wing Ascension).
- Use [Phantom Feathers] to increase Forge progress.
- Each attempt has a success chance; full progress guarantees success.
- Success advances wings to the next Tier, boosting stats and unlocking new visuals.
Wing Tiers: Light Wings, +1, +2, +3, +4, Ex. Light Wings
Wing Tier List
Ex. Light Wings (Base Stats):
| Attribute | Value (0, +1, etc.) |
|---|---|
| Bonus PATK | +40, +46, +52, +58 |
| Bonus MATK | +40, +46, +52, +58 |
| Bonus PDEF | +10, +12, +14, +16 |
| Bonus MDEF | +10, +12, +14, +16 |
| Bonus HP | +285, +339, +393, +447 |
| Heal | +31, +37, +43, +49 |
| Move Spd | +5 (Doesn’t Improve) |
Skills
Players are not limited to skills from their primary class. You can select skills from both paths to customize your character.
There are 8 Skill slots available. You may drag and drop skills into any slot you prefer. Dragging a skill out of a slot will remove it.
Inventory
You can manage all of your items and any gear you have picked up by accessing the Inventory by tapping on its icon from the Main Screen.
Sort: filter items by type.
Stall: On a Trade Zone map, sell items from your inventory.
Mobile Vault: 100 spaces of bank space for item storage. Tap on an item in Inventory and select Add to move it to your bank.

Equipment
Any gear in your inventory can be tapped to display its stats. The option to equip or unequip gear will be displayed on an item. Any currently filled sockets on the item are shown, as well as the current Gem level of the equipment.
An average power rating for the gear is displayed below the item name. Some items are non-tradeable, while others may be exchanged with other players.
Most gear you find in-game will be Unbound and Class-Neutral, meaning you can trade it with other players. You may also opt to sell unwanted items to any of the Vendors in town.
Enchant
You can take a chance and try to enchant your gear to gain great bonuses, but if you fail your attempt, you will lose a level and go back to your older stats.
- Enchanting: Use materials to boost your gear. Each attempt can succeed or fail.
- Success: Gear level increases by 1, significantly boosting base attributes.
- Failure: Gear level decreases by 1, and base attributes revert to the previous level.

Synthesize
You can craft new Gems to socket into your gear to gain great stat bonuses.
- Types: Craft Gems, Gear, and Items. Materials and success rates vary by item.
- Cost: Materials are consumed regardless of success or failure.
- Gear Rules: When using gear as a material, it is only consumed on success. If synthesis fails, the material gear remains in your inventory.

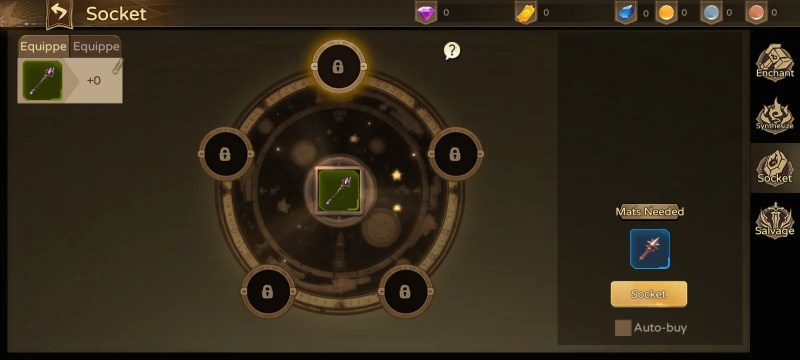
Socket
Adding Gems to your gear will provide extra bonuses to your stats.
- Slots: Every gear piece has 5 locked slots. Use specific tools to unlock them. Requirements vary by gear level.
- Gems: Once unlocked, insert gems for stat bonuses. Each gear type supports different gem categories.
- Removal: Use items to safely remove gems. Removed gems will be returned to your inventory.
Salvage
Any unwanted gear can be liquidated by using the Smelter.
- Filter equipment for salvage by grade and class.
- Salvaging converts gear into the materials shown in the preview.
- Gain Smelter EXP to level up the Smelter and boost character stats.
- Items can be quick-salvaged directly from your inventory.

Artifact
During the tutorial, you will be prompted to clear a series of quests in order to gain access to your first Fragarch (Artifact). After collecting most of the ingredients, the king will send you to collect an Ice Shard from the Revenant’s Vault Dungeon in Twilight Caverns F1.
The minimum level to enter this dungeon is 30, and a party of 5 members is recommended.
Guilds
Beginning at level 28, you will be able to join a Guild. Participating in Guild activities will help to increase your Rank. While it is free to join a guild, creating one costs 20 Gold.
The Guild panel is accessed from a button near the Chat Window, next to Mail and Friends. Any currently recruiting guilds will be listed in the panel. Tapping on the name of any guild will display information about the guild as well as the guild’s Wealth, Members, and Stones.
Make sure you read the guild intro to find out if they have a level or language requirement for new members, and what expectations they have for all members.
Common requirements may include:
- Region / Language
- Player Level
- Daily Donation (Gold)
- Allowance or Disallowance of Player Killing (PK)
- Daily Activity (how many days allowed absent)
Tips
- If your character gets stuck picking up Ore Dust at Himeng you can manually walk to the East side of the map to get the Aura Grass.
- The quest item is located on the SE side of Himeng, near the Ember Wings.
- You can tap on the map and select the Ember Wing monster from the sidebar to navigate directly there and collect the Aura Grass.
- On the Main Quest “Observe Terrain,” you are tasked with using a Binocular to survey two locations. The auto-movement will perform the first use, but you will need to open your inventory (Quest tab) and select the Binocular manually to perform the second survey.
When you first get your Fragarch, it will try to auto-equip. Because the item is unfinished, this will fail, but it will unequip your current weapon. Don’t forget to re-equip yourself.
- Use EXP Boosting items to increase the experience points you receive from combating mobs on the world map. You can place a Campfire to receive an EXP-Over-Time effect for yourself and your pet as long as you remain nearby it.
- These items last for 1 hour and can provide a doubling or tripling effect. These effects do not stack.
- Just park yourself near some mobs +5 levels or more above your current level and engage AFK mode.
- You can safely walk away for an hour. Consider plugging your phone in to charge.
Premium Content and Spending
Prices on Shop purchases start around $5; this is higher than the average for most mobile games for which I have written guides and wikis.
The first Top-Up will unlock Boxing Bear (Pet), x5 Feathers, x5 Mount Tokens, and x5 Divine Tokens in the Perks panel.
The first $200 spent earns the Human Heaven costume (better than Academy Freshman), $500 spent earns Blue Sky (Wings), and spending $1k grants the Heavenly Paladin mount (narwhale) and Demon Sovereign title. $2k spent gets the Commanding Presence title. At $4k spent, you get Azure Star Spirit (Tyria), which I think is a special Skin for the Baby Angel Pet. Finally, $7k spent in-game grants the Sacred Pegasus mount.
- The First Top-Up is $4.99 and includes two Pets: an angel and a demon, x10 200% Mob EXP tickets, and the Academy Freshman Fashion Gift Box.
- Fashion Box contents: Academy Novice costume, which affects stats (gear rating 1,217.6).
- The Baby Angel morphs into Archangel and then Seraph. 15 Crystals are needed per Morph attempt.
- Limited Packs:
- Gem Pack: $19.99, includes x100 Socketing Rods (Lvl 1-60 Gear) and x55 Greater Rods (Lvl 61+ Gear).
- Pet Pack: $29.99, includes x55 Greater Morph Crystals (Consumable-Medicine) and x35 Super Growth Orbs (Pet Boost item).
- Wing Pack: $19.99, includes 2k Crystals (Premium Currency) and x75 Ethereal Wings (Wing Ascension).
VIP

There are 13 ranks of VIP that can be achieved.
Each is progressively more expensive than the last. The total cost of maxing out VIP is $4,000 (349,999 points).
Point accruals are cumulative, so past purchases will contribute towards the total requirement.
| Rank | Beneifts |
|---|---|
| VIP 1: Free (100 pts) | 1.2x Character EXP |
| VIP 2: $3.99 (499 pts) | 1.2x Character EXP 1.2x Pet EXP |
| VIP 3: $8.99 (999 pts) | 1.2x Character EXP 1.2x Pet EXP +2 Wishes daily |
| VIP 4: $18.99 ( pts) | 1.3x Character EXP 1.3x Pet EXP +1 Dungeon Entry daily +2 Wishes daily |
| VIP 5: $48.99 ( pts) | 1.3x Character EXP 1.3x Pet EXP +1 Dungeon Entry daily +3 Wishes daily |
| VIP 6: $98.99 ( pts) | 1.3x Character EXP 1.3x Pet EXP +1 Dungeon Entry daily +1 Delivery daily 5% Off select Shop items +3 Wishes daily |
| VIP 7: $198.99 ( pts) | 1.4x Character EXP 1.4x Pet EXP +2 Dungeon Entries daily +1 Delivery daily 5% Off select Shop items +3 Wishes daily |
| VIP 8: $298.99 ( pts) | 1.4x Character EXP 1.4x Pet EXP +2 Dungeon Entries daily +1 Delivery daily 10% Off select Shop items Enchant limit: Lvl 14 +3 Wishes daily |
| VIP 9: $498.99 ( pts) | 1.5x Character EXP 1.5x Pet EXP +3 Dungeon Entries daily +1 Delivery daily 10% Off select Shop items Enchant limit: Lvl 14 +4 Wishes daily |
| VIP 10: $998.99 ( pts) | 1.5x Character EXP 1.5x Pet EXP +3 Dungeon Entries daily +1 Delivery daily 15% Off select Shop items Enchant limit: Lvl 15 +5 Wishes daily |
| VIP 11: $1498.99 (149,999 pts) | 1.6x Character EXP 1.6x Pet EXP +4 Dungeon Entries daily +1 Delivery daily Enchant limit: Lvl 15 15% Off select Shop items +6 Wishes daily |
| VIP 12: $2498.99 (249,999 pts) | 1.8x Character EXP 1.8x Pet EXP +5 Dungeon Entries daily +1 Delivery daily Enchant limit: Lvl 16 15% Off select Shop items +7 Wishes daily |
| VIP 13: $3998.99 (399,999 pts) | 2x Character EXP 2x Pet EXP +6 Dungeon Entries daily +1 Delivery daily Enchant limit: Lvl 22 15% Off select Shop items +8 Wishes daily |
Demon’s Gift Limited Event (7 days)
- Limited Time: Timed Top-Up (Daily Limit 1) $4.99, includes 500 Crystals, x3 Event Coins, x7 Holy Tokens (Divine Mount: Glacial and Ash Dragons).
- Purchase daily for up to 6 days to receive the following:
- x2 Event Tokens (Spin Lucky Wheel)
- x5 Godina Crystals (boosts Auguric Weapon stats)
- x3 Event Tokens
- Dragon Swift (Mount) has the following stats:
- Player HP: +51.3%
- Player ATK: +44.1%
- Player DEF: +48.7%
- Player Heal: +42.1%
- Move Spd: +180
- x4 Event Tokens
- 6-Day First Top-Up Pack: Use to obtain x4 Fragneron Shards and x1 First Top-Up Token.
Lucky Wheel: Spend 1 Event Token to spin the wheel. Limit: 10 times per day. Multipliers apply.
- Lucky Wheel prizes include the following:
- x1 Upgrade Crystal (Bound): Use in Pet – Pixie menu.
- x3 Health Orb (Bound): Automatically fills HP when it drops below 50%.
- x1 Fragneron Shard (Bound): Fused from Lvl 5 Rubies and Lvl 5 Topazes. Craft via Synthesis.
- x1 Super Coin: Obtained from events. Used to redeem rare grand prizes from events.
- x3 Divine Mark: Required to upgrade elite Handbooks. Available in the Shop.
- x20 Rose: Gift to friends to increase their Charm and your shared Intimacy. Source: Boss Drops.
- x10 Pet Essence: Essential for Pet Handbook absorption. Drops in Monster Jungle.
- x2 Soul Shard: Used to upgrade Godhood. Fused from Soul Root Crystals at the Pixie Elder near the Tree of Life. Source: Ladder or Shop.
| Tier | Contains | Limit | Price |
|---|---|---|---|
| Demon’s Gift 1 | 1k Crystals, x2 Overlord Chests | 10 | $9.99 |
| Demon’s Gift 2 | 2k Crystals, x4 Overlord Chests | 10 | $19.99 |
| Demon’s Gift 3 | 3k Crystals, x6 Overlord Chests | 10 | $29.99 |
| Demon’s Gift 4 | 5k Crystals, x10 Overlord Chests | 10 | $49.99 |
| Demon’s Gift 5 | 10x Crystals, x20 Overlord Chests | 10 | $99.99 |
- Overlord Chest (Loot Box) contains one of the following:
- 5.5k Crystal Card x1
- 2k Crystal Card x1
- Black Dragon Coin x8
- Divine Token x10
- Ethereal Feather x15
- Mount Token x21
- Dragon Core x21
- Sacred Gem II x11
- Sacred Gem III x7
- Sacred Crystal x5
- Health Orb x7
- Mana Orb x7

Leave a Reply